Syncing data with CloudKit in your iOS app using CKSyncEngine and Swift
Have you wanted to use CloudKit, but didn't know where to start? Then check out CKSyncEngine, introduced with iOS 17, which makes it all much easier.
People expect sync. These days, it's not a novel feature — it's a baseline expectation.
Of course, as developers — we know the problem with that line of thinking. Getting sync right is hard. There's a lot to consider: conflict resolution, network conditions, account status changes and more. No matter — sync is still a tentpole feature. On iOS, there is a clear choice to support it, and that's the CloudKit framework.
The rub?
Historically, it's been hard to get started with. The learning curve is
higher than most frameworks, making the barrier to entry a non-starter for
many developers. But today, I'm here to help anyone who wants to figure out
how sync works in iOS apps. With the new CKSyncEngine,
it's much, much easier to implement. Apple is dogfooding it too —
both Freeform and NSUbiquitousKeyValueStore use it.
Here, we'll build an app that syncs your favorite quotes between all of your devices. We're going to keep it simple, and I'll only include what you need to know to get started. By the end, you should be in a good spot to start slotting in CloudKit sync into your own app.
Let's go!
CloudKit Primer
Before we get to the code, we need to do two things:
- Understand very basic CloudKit terminology.
- And, get our project setup.
To use CKSyncEngine, there are at least two things to know about:
- CKRecord: Think of records as the individual rows in a database you'd save, delete or update. They also map directly to your data models.
- CKRecordZone: A zone, then, can be thought of as a table in a database. This comparison isn't exactly 1:1, but it's close enough.
So, we have records that we save in zones. That's important to understand, and for our purposes at least — that's all you need to know to get started. However, I'm going to include a few more terms to round out your knowledge.
CloudKit works by assigning your app its own container (CKContainer). Within that, you'll have one or more databases (CKDatabase). And then, within those databases — you use the two important objects we covered above (zones and records).
Project Setup
Now here's the last bit to get out the way before we start. First, under "Signing & Capabilities" -> "Signing", change the team and bundle identifier to use your own Apple developer account. Next, CloudKit requires these things to use, test and develop:
- An active Apple developer account.
- Enabling background modes (remote notifications) and CloudKit under "Signing & Capabilities" in your Xcode project. This is done already in the demo project.
- A CloudKit container setup for your app under the "iCloud" section found in "Signing & Capabilities". The demo project has mine, but you'll want to use your own team under "Signing" and create a new container.:

- Finally, you'll need at least two Apple devices signed in with the same Apple ID. The best setup is an iPhone and another iPhone or iPad. But, you can use your mac, too. So, any combination of at least two of these: Mac, iPhone or iPad.
Xcode automatically adds the "Push Notifications" capability to your target
if you enable the CloudKit service, so you won't need to manually do that.
CloudKit will use silent push notifications to inform your app of
server-side changes to your data. With CKSyncEngine, you don't
need to think about it — but it's good to know that's how it's working.
Your "Signing & Capabilities" section should look like this now — with our own team used for signing and a new CloudKit container:
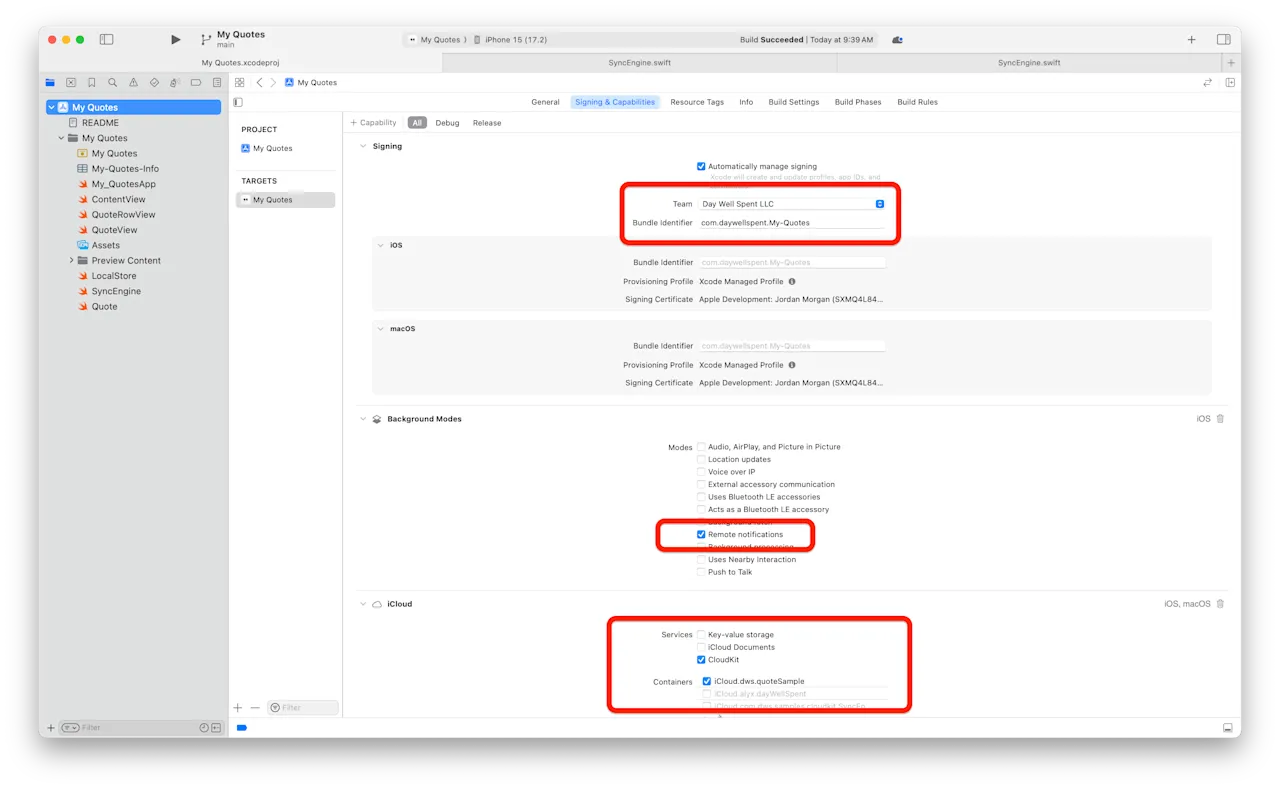
If it does, the last thing you need to do is copy the container identifier
you're using. In the image above, that's the last item with the red square
around it. In the demo project, open SyncEngine.swift and
change this line to include your container:
private let container: CKContainer = CKContainer(identifier: "iCloud.dws.quoteSample")Using CKSyncEngine
Using CloudKit APIs directly is powerful, but it's a lot work. Just check out the open source sync code from my previous app, Spend Stack. Traditionally, you had to worry about incoming push notifications, inspecting their payloads, caching server change tokens, setting up operations for zone setup and more. And, that's before you even save anything!
Those days are gone. Let's see how CKSyncEngine does it all for us.
To understand how it works, you have to understand these six steps. You don't need them memorized, since steps 5 and 6 are what you'll mainly be doing, but the first four contain important setup tasks:
- You initialize the engine as early as you can in your app's lifecycle.
- You give it a database (shared or private, not the public database) and setup a delegate for the sync engine.
- You keep around a state token, cached locally.
- You setup a zone for your records.
- Then, you tell the sync engine's state to save and delete things. Also, an edit is expressed as a save — the sync engine will figure it out.
- Finally, the sync engine will inform us when changes come from the server — then we just react to those changes in our local cache.
To express those changes, you send the sync engine records. Remember those? They are reflections of your app's model and their data. From there, two primary functions will power syncing:
handleEvent(_ event, syncEngine)nextRecordZoneChangeBatch(_ context, syncEngine)
Those two functions are found in CKSyncEngineDelegate - and
they are what make the whole thing work. The best way to understand them is
with this mental model:
-
In
handleEventwe generally react to the server by updating our cache from syncs, handle errors from changes we sent, setup our initial zone and handle any account changes. -
In
nextRecordZoneChangeBatch- we send things to the server to update on other devices.
At this point, open up SyncEngine.swift and simply take a look
around. You don't need to understand all of it, but you'll get a feel for
how it's all working. The rest of this post is going to walk you through
each important step, and show you how it's implemented in the demo project.
Associating records with models
When associating your app's data models with CloudKit, you have one major
responsibility: putting anything you want to sync inside of a
CKRecord. As such, a record and a data model are closely
coupled. Records work much like a dictionary, making them easy to work
with.
In our app, we have only one model — Quote.swift. Here are the
properties we have within it solely for CloudKit. Read each comment above
them carefully:
// Where are we saving this model?
static let zoneName = "Quotes"

// What kind of record does it save to?
static let recordType: CKRecord.RecordType = "Quote"

// What's the zone ID to save it in?
private var zoneID: CKRecordZone.ID?

// What will the unique record ID be? This should match your model's unique ID, if it has one already.
private var recordID: CKRecord.ID?

// Where you'll save the data, and it relies on the properties above
private(set) var syncRecord: CKRecord?

// A locally cached version of the record. When a newer version of the record comes in from the server, we'll update this too.
private var syncRecordData: NSData?
Our main responsibilities with records is to cache them with our model
(done so via syncRecordData here, and we later initialize our
syncRecord back from that data) and to update it with our
app's data. In the demo project, I used NSKeyedArchiver to
save data. You can see where we're saving off the Data
representation of a record, too:
let archiver = NSKeyedArchiver(requiringSecureCoding: true)
record.encodeSystemFields(with: archiver)
syncRecordData = archiver.encodedData as NSData
No matter how you save data in your app, just be sure to persist the data from the record as well.
Finally, in the update(text: String) function we also update
the record itself. This is how the data from our app will reach CloudKit's
servers, specifically — the last line of code here:
// MARK: Updates
func update(text: String, updateRecord: Bool = false) {
    self.text = text

    guard updateRecord else { return }

    guard let record = syncRecord else {
        fatalError("☁️ We should have a record here.")
    }

    // Save to CloudKit record
    record.encryptedValues["textQuote"] = text
}
That record works both ways, too. So, when we get an updated record from the sync engine — we also update our local models from it. I find it's best to have two things:
- An initializer that takes in a
CKRecordfor new data that came from the server. -
And, an
update(with record: CKRecord)function that updates existing local models from their updated counterparts which came from the server.
In the demo project, we do both of those things:
Making a new local model from a record
init(record: CKRecord) {
    self.text = record.encryptedValues["textQuote"] as? String ?? ""
    self.id = record.recordID.recordName
    syncRecord = record
    let archiver = NSKeyedArchiver(requiringSecureCoding: true)
    record.encodeSystemFields(with: archiver)
    syncRecordData = archiver.encodedData as NSData
}
Updating an existing local model from a record
// MARK: CloudKit Interfacing
extension Quote {
    func updateWith(record: CKRecord) {
        print("☁ Updating Quote with a record...")

        // Update the text
        if let updateText = record.encryptedValues["textQuote"] as? String {
            print("☁️ Updating text from \(text) to \(updateText)")
            text = updateText as String
        }

        // And save off the updated record
        syncRecord = record
        let archiver = NSKeyedArchiver(requiringSecureCoding: true)
        record.encodeSystemFields(with: archiver)
        syncRecordData = archiver.encodedData as NSData
    }
}Queueing Changes
Now, let's get to sending changes to CloudKit with our sync engine. When we
save a Quote to our local store, it also tells the sync engine
about it. Open up LocalStore.swift and check out the
saveQuotes() function:
private func saveQuotes(queueChanges: Bool = true) {
    LocalStore.save(quotes)

    if queueChanges {
        Task {
            await cloudSync.queueQuotesToCloudKit(quotes)
        }
    }
}
Specifically, the queueQuotesToCloudKit() function. Look at
that function now, and you'll get to the heart of how a sync engine works.
You tell the state something changed, and provide the record IDs in
question.
Let me write that again, because this is core to the sync engine: You schedule sync changes by adding record IDs to the sync engine state as either deletes or saves. Here, we're doing just that:
// What are the record IDs? These match a Quote's ID.
let recordIDs = quotes.compactMap { $0.syncRecord?.recordID }

// From those IDs, tell the sync engine what kind of operation this is
let changes: [CKSyncEngine.PendingRecordZoneChange] = recordIDs.map{ .saveRecord($0) }

// Add them to the state
engine.state.add(pendingRecordZoneChanges: changes)
With just those three lines, the sync engine will do a lot of
work. It'll schedule the sync according to system conditions, setup pushes
in the background and handle them, create CKOperation
instances to shuttle data, create and manage as many
CKSubscription as it needs and more.
But for us? We just change state, and that's pretty much it! That's the
power of CKSyncEngine. You'll notice we do the same thing when
we want deletes to occur. Inside SyncEngine.swift:
func queueQuoteDeletions(_ quotes: [Quote]) {
    print("☁️ Queues a deletion to the sync state.")
    let recordIDs = quotes.compactMap { $0.syncRecord?.recordID }
    let deletions: [CKSyncEngine.PendingRecordZoneChange] = recordIDs.map{ .deleteRecord($0) }
    engine.state.add(pendingRecordZoneChanges: deletions)
}Sending Record Batches
Now, we arrive at the first of the two important sync engine functions we talked about. Remember, both of the two key functions are from the sync engine delegate.
Open up SycnEngine.swift and look at our implementation of
nextRecordZoneChangeBatch(context, syncEngine). This function
is where we send the actual records from our models. Basically,
what we send here is what is scheduled to sync to the server. We don't have
to say whether they are edits, deletes or saves — the sync engine will
already know due to the steps we just talked above above.
Here's our implementation:
// Delegate callback signifying CloudKit is ready for our changes, so we send the ones we marked earlier
func nextRecordZoneChangeBatch(_ context: CKSyncEngine.SendChangesContext, syncEngine: CKSyncEngine) async ->
CKSyncEngine.RecordZoneChangeBatch? {

    // 1
    let scope = context.options.scope
    let changes = syncEngine.state.pendingRecordZoneChanges.filter { scope.contains($0) }
    let quotes = LocalStore.lastCachedQuotes()

    // 2
    let batch = await CKSyncEngine.RecordZoneChangeBatch(pendingChanges: changes) { recordID in
        // 3
        guard let matchedQuote = quotes.first(where: { quote in
            return quote.id == recordID.recordName
        }) else {
            // 4
            // These are pending changes that were deleted in our store.
            // In that case, remove them from any sync operations.
            syncEngine.state.remove(pendingRecordZoneChanges: [ .saveRecord(recordID) ])
            return nil
        }

        // 5
        // It's important to update the CKRecord values here before you send them off
        matchedQuote.update(text: matchedQuote.text, updateRecord: true)
        return matchedQuote.syncRecord
    }

    print("☁️ Sending changes via nextRecordZoneChangeBatch with \(batch?.recordsToSave.count ?? 0) saves/edits and \(batch?.recordIDsToDelete.count ?? 0) removals.")

    // 6
    return batch
}
Here, we have to return an instance of
CKSyncEngine.RecordZoneChangeBatch — and that will house the
CKRecord instances from our Quote objects. One
important bit here that's easy to miss — this is also a good time to update
your record with the data from its corresponding model:
matchedQuote.update(text: matchedQuote.text, updateRecord: true)If you forget this, you'll be left wondering why CloudKit is syncing records with empty data. Here's a breakdown of how this function works, and generally what you'll do in your own app:
- Grab the context's scope and use it to filter for pending changes based off of your sync engine's state.
- Then, initialize your
RecordZoneBatchChangesstruct from it. - For each record ID we get, match it up to a local
Quote. Remember, theCKRecordID.recordNameshould always match your local data model's identifier. - If it's not present, that quote was removed. So, remove it from the state to avoid unnecessary work.
- We update the actual
CKRecordwith the data from our model. - Finally, we return it.
Handling State
And finally, we come to the second, and last, important part of working
with our sync engine. The handleEvent(event, syncEngine)
function is crucial.
When you first look at this implementation in the demo project, it's easy to be intimidated — but don't be! Essentially, the sync engine let's us know what kind of sync operation just happened, and we can react to it or leave it alone. That's why you're seeing the "big ol' switch" statement:
func handleEvent(_ event: CKSyncEngine.Event, syncEngine: CKSyncEngine) async {
    print("☁️ sync engine event came in, processing...")
    switch event {
    case .stateUpdate(let stateUpdate):
        print("☁️ Caching sync token.")
        let recentToken = stateUpdate.stateSerialization
        cacheSyncToken(recentToken)
    case .accountChange(let accountChange):
        print("☁️ Handling account change.")
        processAccountChange(accountChange)
    case .fetchedDatabaseChanges(let fetchedDatabaseChanges):
        print("☁️ Processing database changes.")
        processFetchedDatabaseChanges(fetchedDatabaseChanges)
    case .fetchedRecordZoneChanges(let fetchedRecordZoneChanges):
        print("☁️ Processing record zone changes.")
        processFetchedRecordZoneChanges(fetchedRecordZoneChanges)
    case .sentRecordZoneChanges(let sentRecordZoneChanges):
        print("☁️ Processing sent record zone changes.")
        processSentRecordZoneChanges(sentRecordZoneChanges)
    case .didSendChanges,
         .willFetchChanges,
         .willFetchRecordZoneChanges,
         .didFetchRecordZoneChanges,
         .didFetchChanges,
         .willSendChanges,
         .sentDatabaseChanges:
        // We don't use any of these for our simple example. In the #RealWorld, you might use these to fire
        // Any local logic or data depending on the event.
        print("☁️ Purposely unhandled event came in - \(event)")
        break
    @unknown default:
        print("☁️ Processed unknown CKSyncEngine event: \(event)")
    }

    // Simplified approach for demo app. Tell the LocalStore to fetch cached changes to reflect
    // All sync edits/updates/etc.
    NotificationCenter.default.post(name: .cloudSyncChangesFinished, object: nil)
}
When implementing this in your app, you'll want to follow the same pattern.
For the events you want to know about, make a function to handle it. Then,
in the switch event — pass the data down to it. This will keep
the function as clean and lean as possible.
Here are two critical events we're handling:
-
case .stateUpdate(let stateUpdate):: This is where we cache a state token. If we miss this, the sync engine has no idea where it left off. This token is also given to the sync engine when it's initialized. If you've used CloudKit before, it works much like a server change token does. -
case .fetchedRecordZoneChanges(let fetchedRecordZoneChanges):: This is where new, updated or deleted data from other devices is reflected. Here, we update our local cache based off of theCKRecordinstances it provides us.
Handling record zone changes is the most common operation you'll handle
here. This is where we look at all of the deletes, adds and edits for our
Quote instances, and we update our cache accordingly:
func processFetchedRecordZoneChanges(_ changes: CKSyncEngine.Event.FetchedRecordZoneChanges) {
    var quotes: [Quote] = LocalStore.lastCachedQuotes()

    // These are new, or edited/updated, Quotes...
    for modification in changes.modifications {
        let record = modification.record

        // If we have it locally, it'll match here.
        let isEdit = quotes.contains { quote in
            return quote.id == record.recordID.recordName
        }

        // If it's an edit, update the quote's text and assign it the new record
        if isEdit {
            print("☁️ Editing an existing record.")
            guard let editIndex = quotes.firstIndex(where: { quote in
                return quote.id == record.recordID.recordName
            }) else {
                fatalError("☁️ We received a record to edit that should exist locally.")
            }

            quotes[editIndex].updateWith(record: record)
        } else {
            print("☁️ Adding a new record.")
            // New Quote added from another device, so save it
            let quote = Quote(record: record)
            quotes.append(quote)
        }
    }

    // Quotes that were on one or more devices, so remove it locally if we've got it.
    for deletion in changes.deletions {
        let recordID = deletion.recordID.recordName

        if let removalIndex = quotes.firstIndex(where: { quote in
            return quote.id == recordID
        }) {
            print("☁️ Deleting a quote with ID \(deletion.recordID)")
            quotes.remove(at: removalIndex)
        } else {
            print("☁️ Deletion request for quote with ID \(deletion.recordID) - but we don't have it locally.")
        }
    }

    // Set cache with these changes...
    LocalStore.save(quotes)
}
Are there more events to know about? Of course, in the switch
— I've listed all of them. Look at the sample project to see how they are
handled. Of note, in .accountChange() — we setup our record
zone.
At this point, we've covered the mission-critical steps and aspects of using
CKSyncEngine!
Odds and ends of syncing with CKSyncEngine
If all that you wanted was a primer of CKSyncEngine, then
you're all done! However, consider this an optional bonus section where we
can cover some topics or obstacles you're likely to encounter.
How should local stores and sync engines work together?
This is always one of the hardest parts of writing CloudKit sync. The inclination is to keep them seperate. Seperation of concerns, and all of that, right? You'll quickly feel the tension, though, because the sync engine has to know about local changes.
How you handle this is up to you. In the demo project, I took the "lazy" route to focus on syncing. In a real app, I've seen delegate setups, weak references to stores and more being used. The right answer will depend heavily on how your own app is setup. Be aware when you start, though, that the sync engine will need to know about each delete, edit or add that occurs.
Can you force syncs?
Yes! While one of the main benefits of a sync engine is its ability to intelligently schedule syncs (they usually occur in a few seconds), there are cases where you might want to do this.
For example — pull to refresh. Or, deleting all user data. Regardless, "force" syncing or fetching are one line operations:
engine.fetchChanges()
engine.sendChanges()
How do identifiers work?
Here's one that's easy to miss. Remember this: each CKRecord
has a CKRecordID associated to it. That record ID has a
property called recordName. This is what should match 1:1
with your model's identifier. If you look at our Quote
class, you'll see that happening:
let recordID = CKRecord.ID(recordName: id, zoneID: zoneID)Since sync code figures out which records to work with from their record IDs, we also use them to match records to our local models. That's why you see code like this in the sample project:
return quote.id == recordID.recordName
So, remember, the CKRecordID.recordName should be the same as
your local model's identifier.
Wait, when did we set up the record zone for Quotes?
Before you can work with records, they need a zone to live in. That zone
creation has to happen first. When we fire up a sync engine, we
also conveniently get an accountChanged event — this is a great
spot to setup the zone. In the sample app, you'll see that in
.signIn we call reuploadEverything() which creates
the zone:
engine.state.add(pendingDatabaseChanges: [ .saveZone(CKRecordZone(zoneName: Quote.zoneName)) ])If you don't do this, you'll quickly see errors come in indicating that a zone doesn't exist to save the records in.
Are there other ways to use CloudKit?
Of course! You can use NSPersistentCloudKitContainer for a full
stack solution of local persistency and syncing. And, the full suite of
CloudKit APIs are available, as they always have been. But if you're not
using NSPersistentCloudKitContainer — then you should likely be
using CKSyncEngine.
Am I ready to ship my CloudKit app after reading this?
No! There are other things to take care of, such as deploying your CloudKit schema. A great place to start is this article, which explains some of the steps you need to take.
Final Thoughts
CloudKit is going to become more and more popular once developers realize how much less work it takes to use now. Even though this post might be on the longer side, it does cover a very technical, error-prone part of app development. — syncing data.
At this point, here's what I recommend you do:
- Watch this WWDC video over CKSyncEngine. It'll make much more sense now after reading this, and it's also not very long.
- Then, read this post one more time!
- Next, dive into the sample project again until you start to understand how it truly works.
- Finally, start adding in
CKSyncEngineto your own app.
Once you've got sync up and running, you might need a hand with another key aspect of app development — implementing purchases and getting a paywall showing. At Superwall, we can have that part done in minutes. Check out our iOS guide here.