Creating, testing and releasing your first iOS subscription product and app to the App Store
From App Store Connect, to TestFlight and everything in-between, follow this all-in-one guide to get your next idea into production.

Launching an app and earning that initial revenue represents an exciting milestone. However, the path to release can feel overwhelming. This comprehensive guide walks through each essential step, from initial setup through App Store publication. The process covers:
- Creating an Apple developer account
- Setting up a new app in App Store Connect
- Configuring subscription products in App Store Connect
- Displaying products using Superwall
- Testing through TestFlight
- Preparing for App Store review
- Publishing to the App Store
Prerequisites
This guide assumes familiarity with Xcode and the ability to build and run apps in the iOS simulator. You should have an app under development ready to monetize. Note that this is not a programming guide but rather focuses on making your existing app testable with real products and deployment-ready.
Create a developer account with Apple
If you lack an active developer account, visit Apple's enrollment page and complete registration before proceeding.
Sign into Xcode
Ensure your developer account credentials are configured in Xcode:
- Open Xcode Preferences: Navigate to Xcode > Preferences
- Select the Accounts tab
- If not signed in, click Add Account and follow the authentication prompts
Once authenticated, open your app in Xcode and confirm your developer team appears in the Signing & Capabilities section.
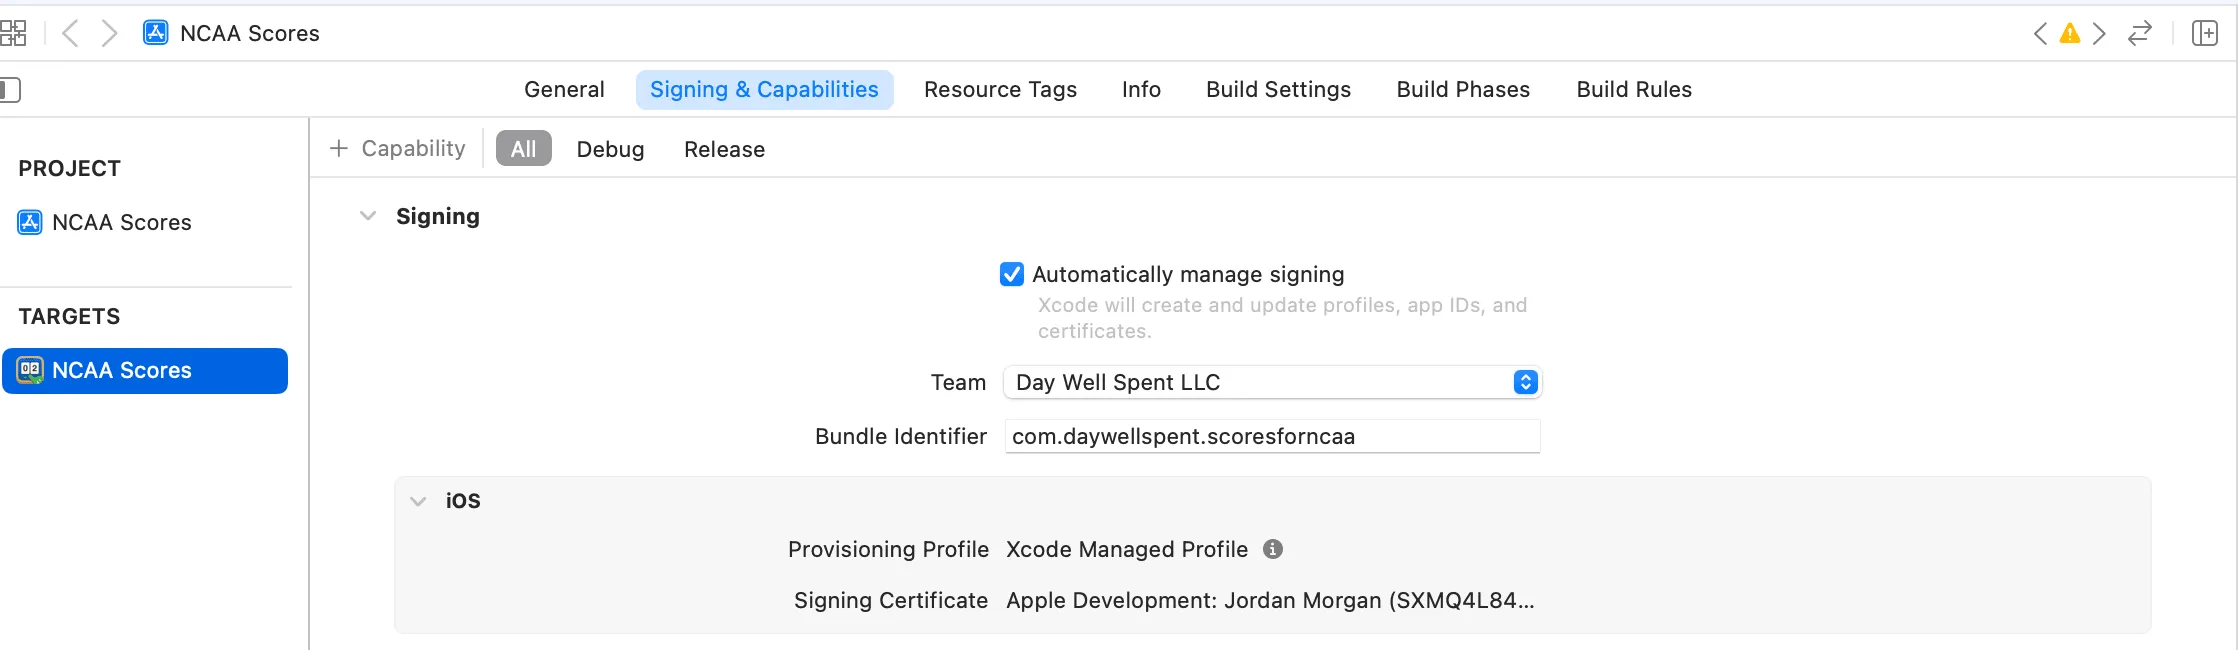
Creating an app in App Store Connect
Navigate to App Store Connect and create your new app:
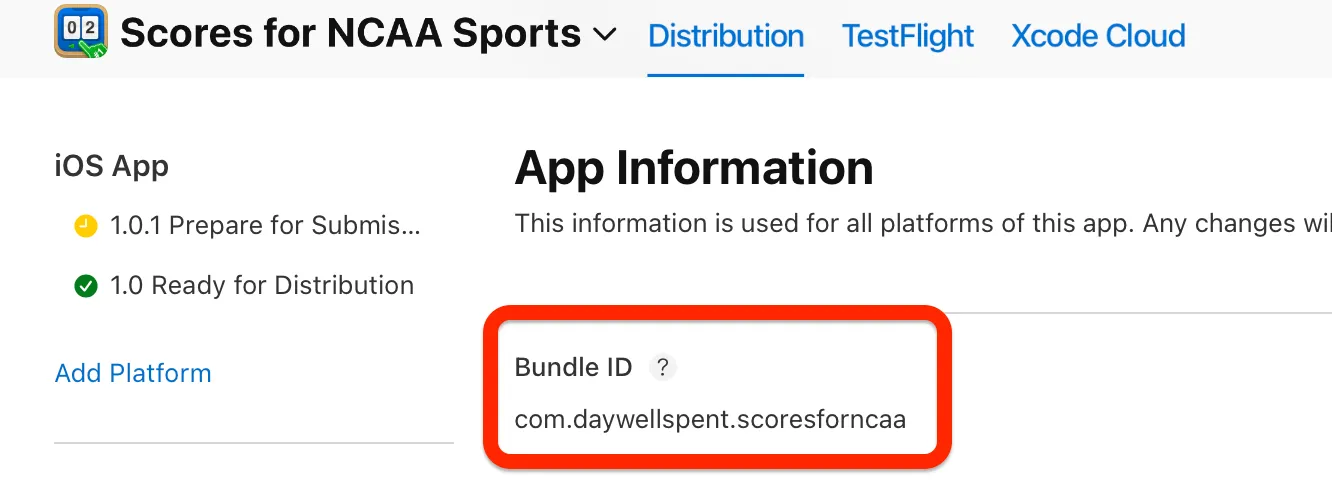
- Select Apps and click the blue plus button
- Complete the metadata form, ensuring iOS is selected under Platforms
- Create a bundle ID in the Certificates, Identifiers & Profiles section

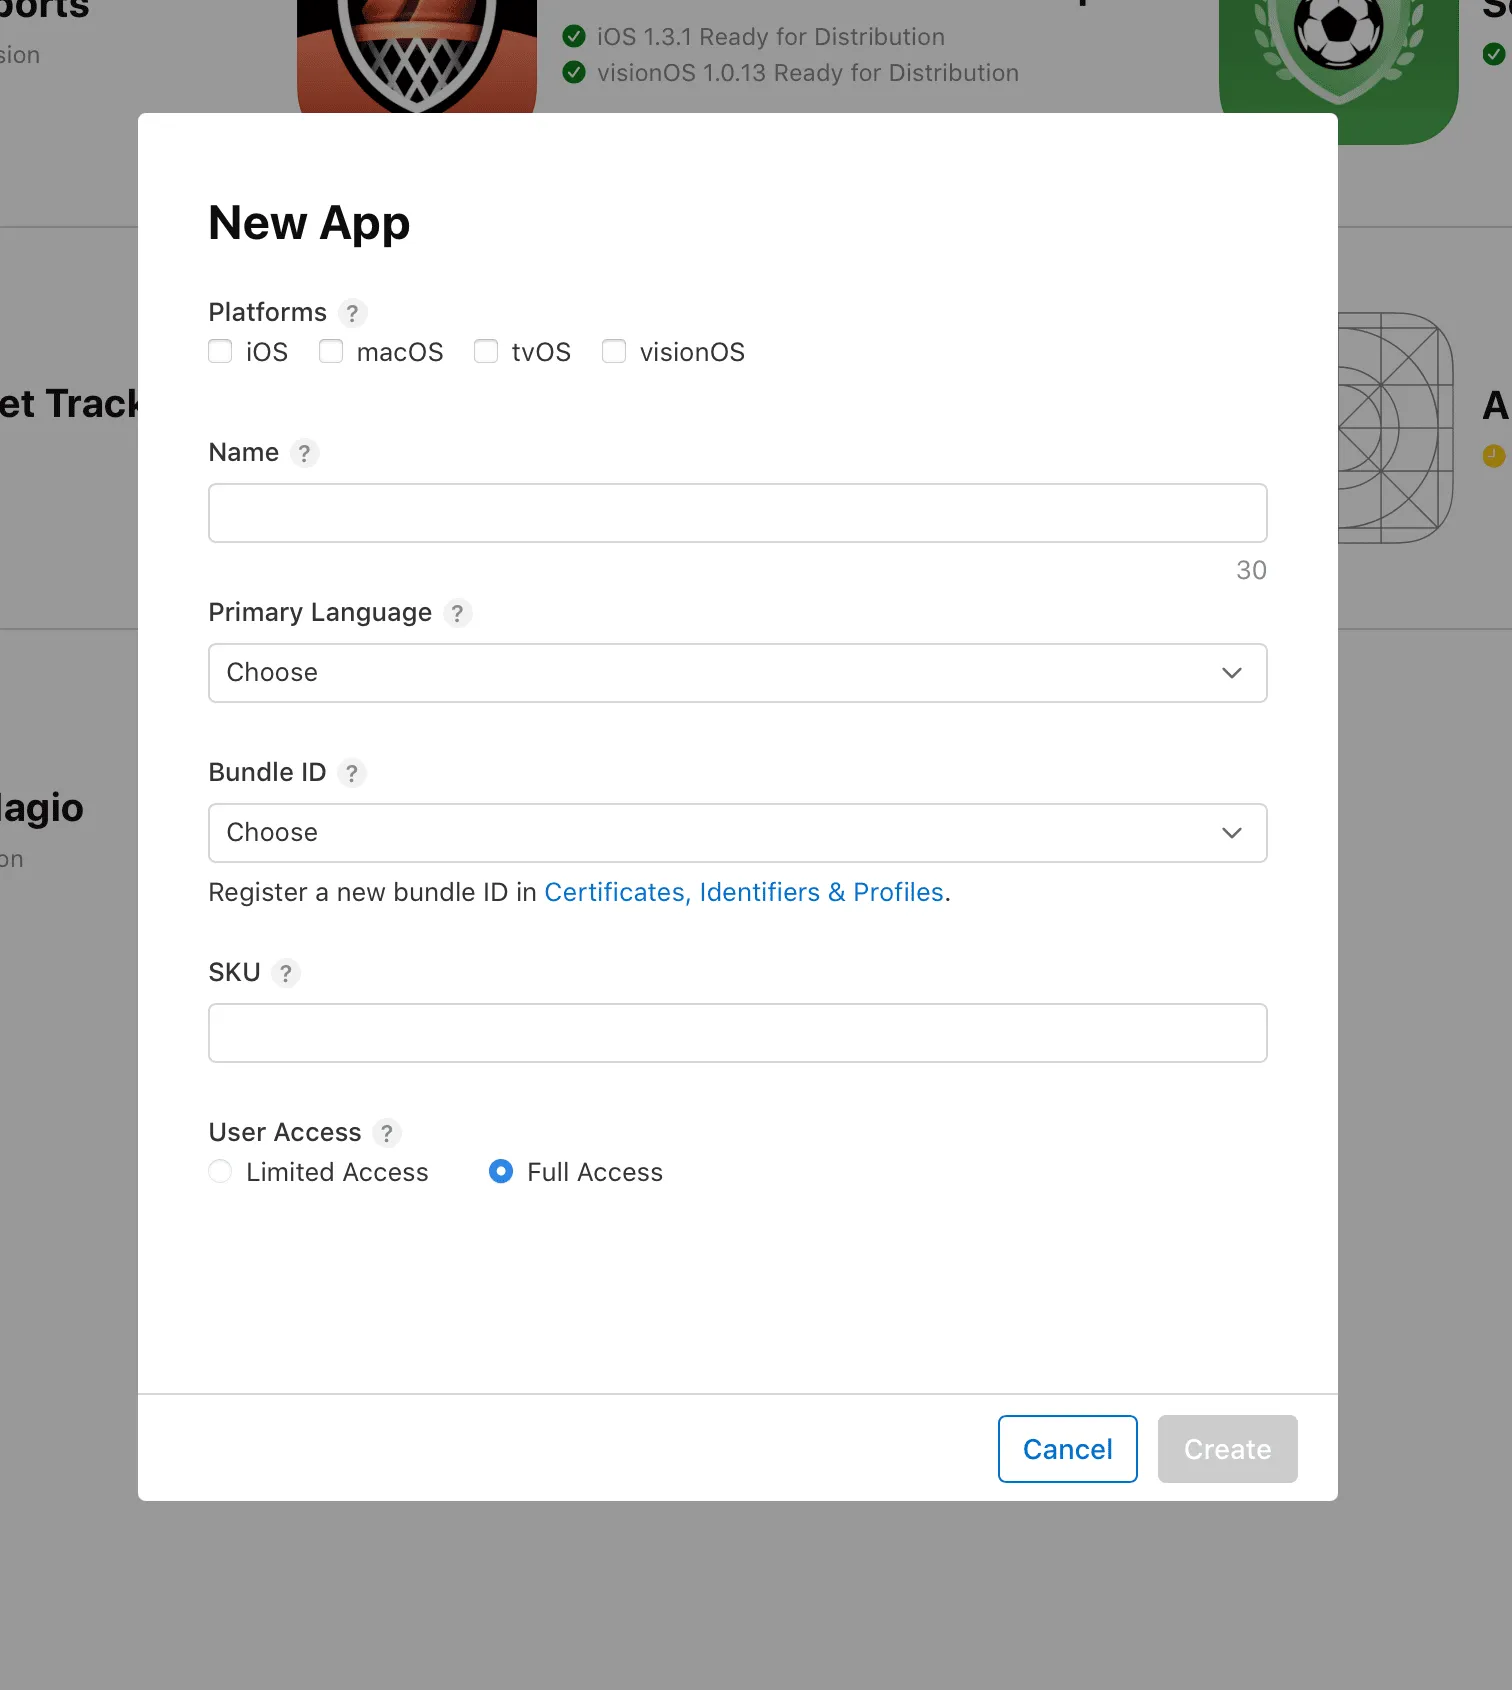
The bundle ID serves as the crucial link between App Store Connect and
Xcode. Verify that the identifier matches exactly in both locations—for
example, com.daywellspent.scoresforncaa.
Creating subscriptions in App Store Connect
Create a subscription group
Subscription groups organize your app's offerings. Key characteristics include:
- Users can subscribe to only one product per group simultaneously
- Users can upgrade, downgrade, or switch between subscriptions within the same group
- Separate subscription groups allow independent offerings
- Users may maintain subscriptions across multiple groups but only one product per group
Think of subscription groups as a restaurant menu where customers select one item but can exchange it later.
To establish a subscription group:
- Open your app in App Store Connect
- Navigate to App Store > Monetization > Subscriptions
- Click the create button under Subscription Groups
- Name your subscription group and save
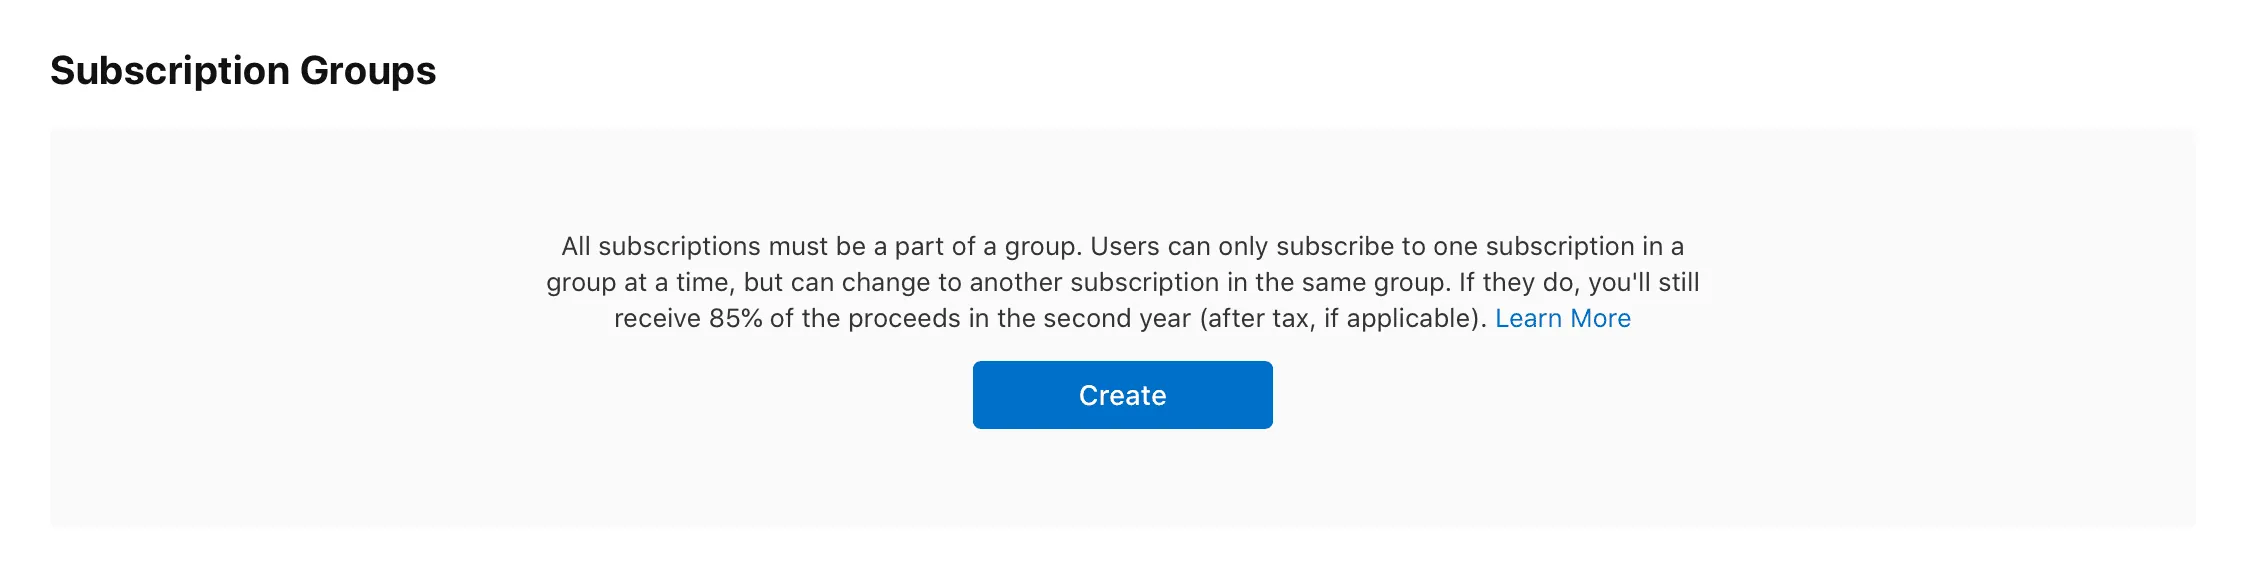
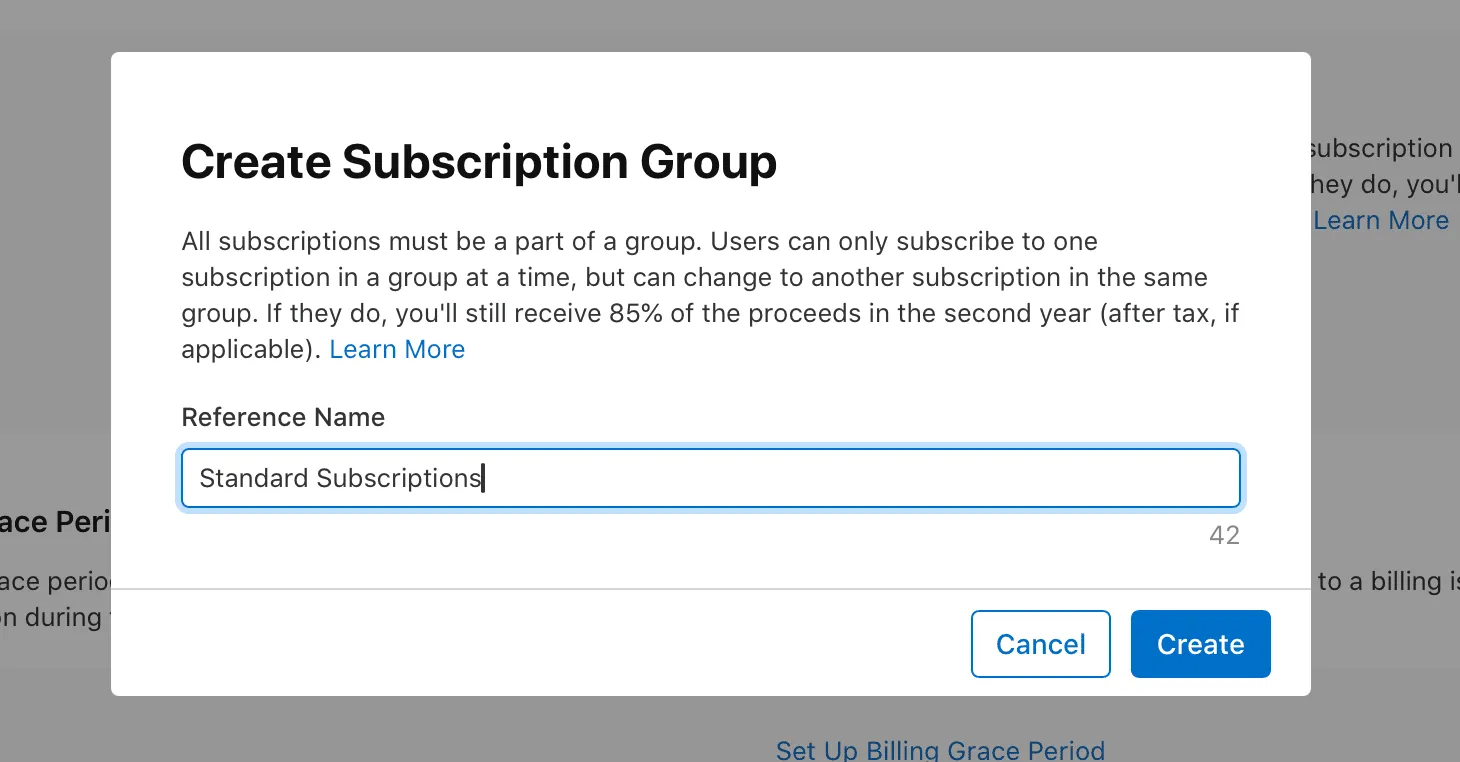
Create a subscription
Add one or more subscriptions within the group:
- Click Create under Subscriptions
- Enter a Reference Name (visible in App Store Connect reporting, not to users)
- Enter a Product ID (internal identifier, not user-facing)
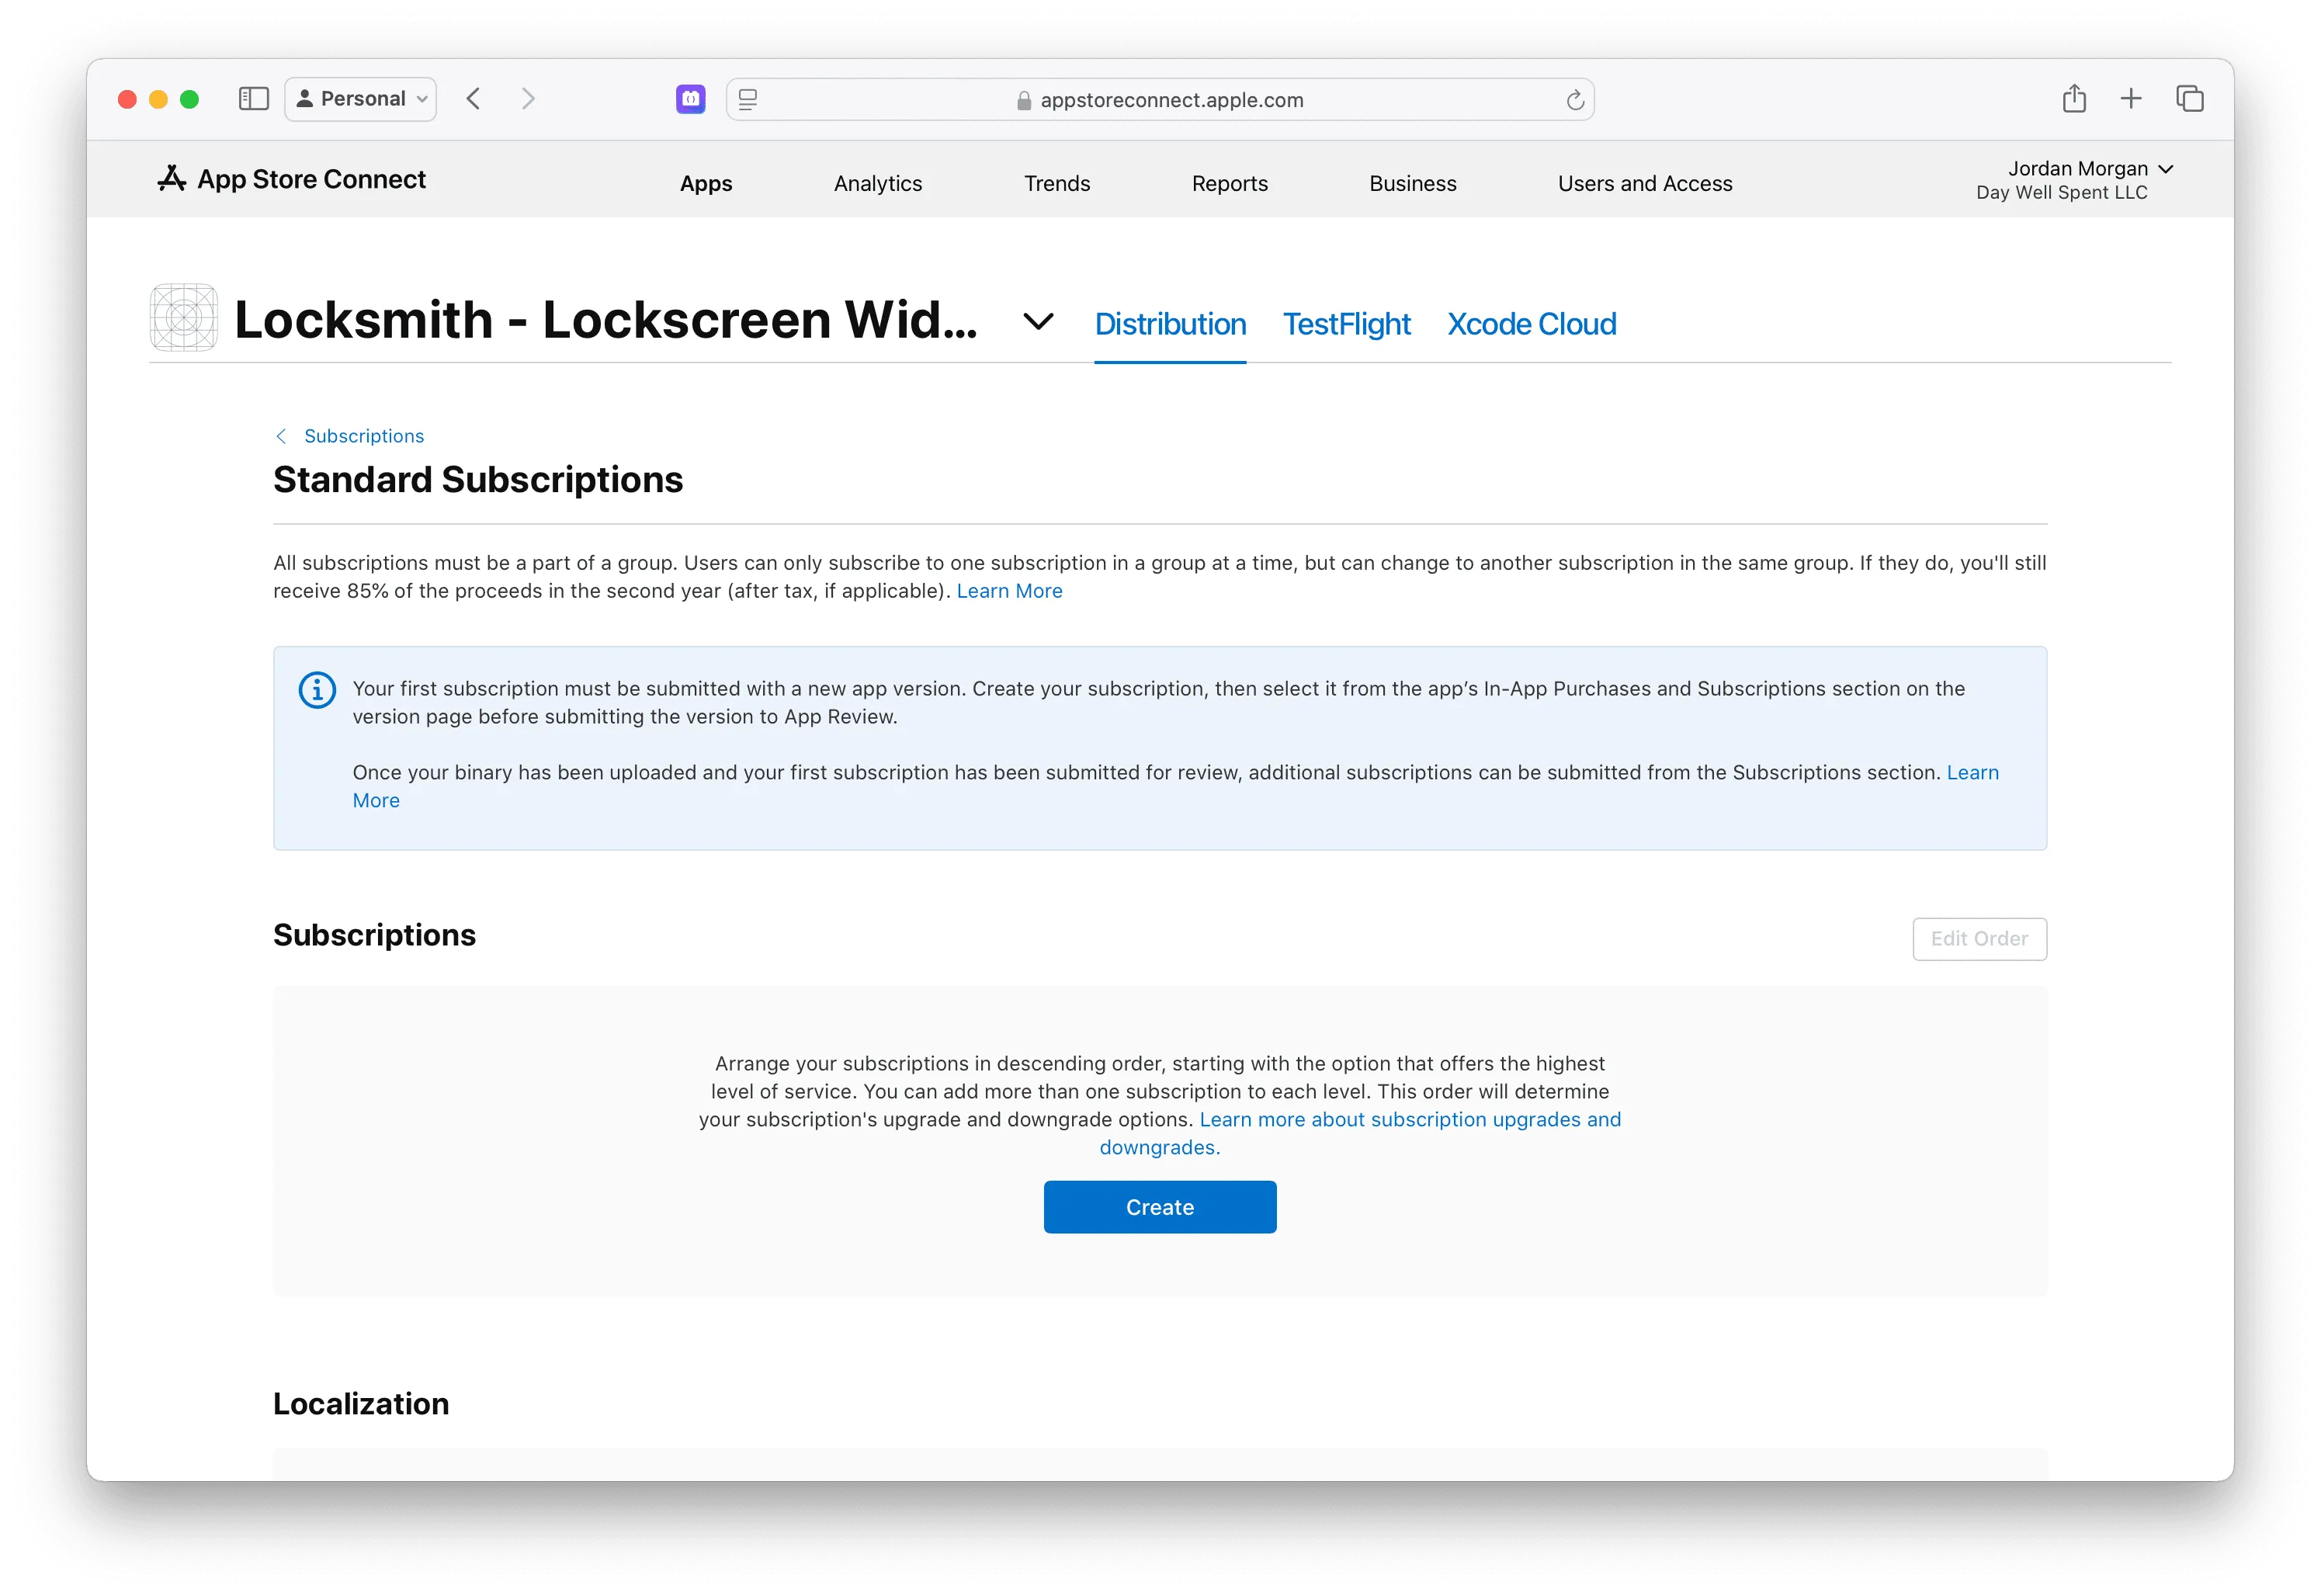
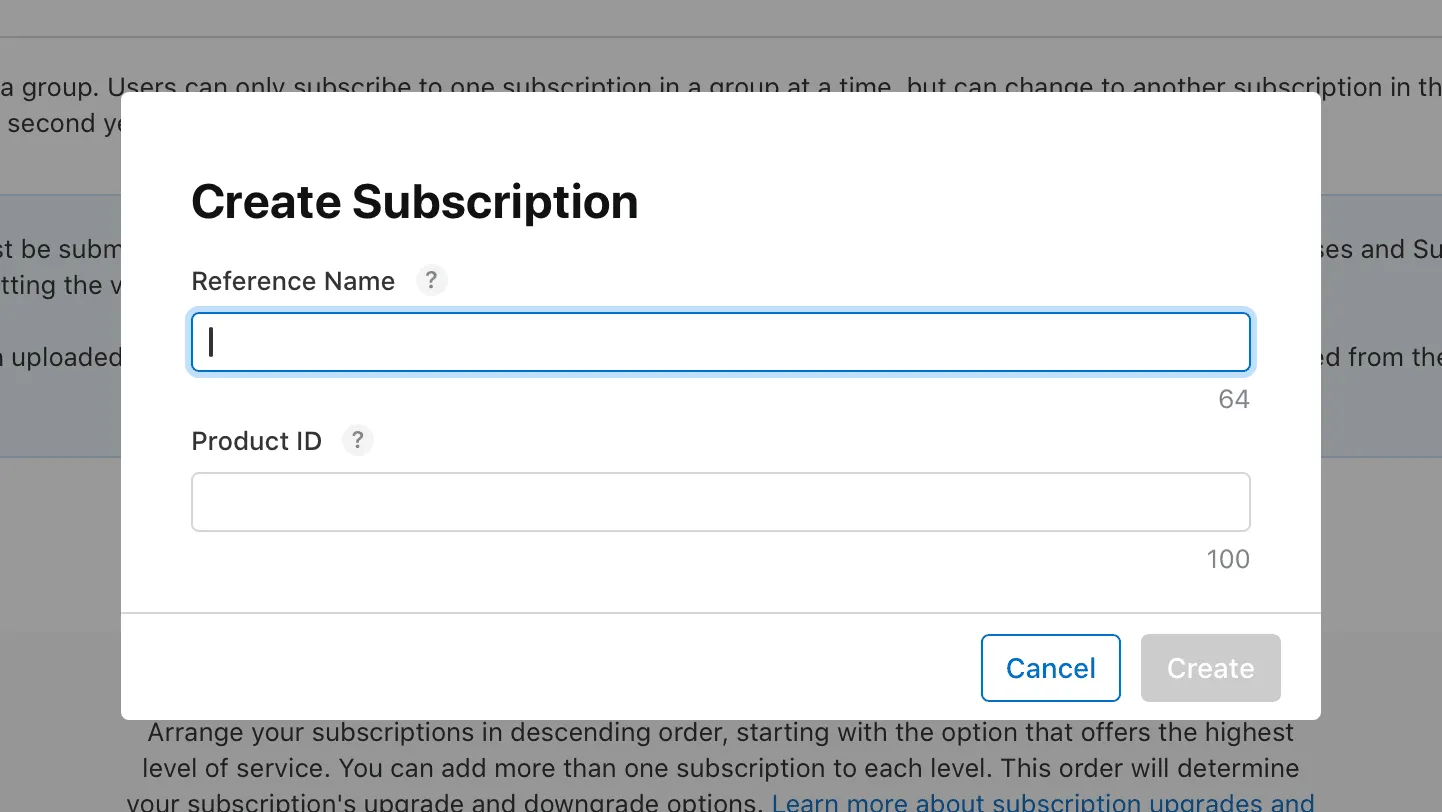
Example naming from a real app uses descriptive identifiers conveying plan, price, and trial duration details.

Fill in subscription details
Configure pricing, duration, and metadata:
- Set subscription duration using the toggle in the page's top right
- Click Setup Availability to select territories or confirm worldwide availability
- Click Add Subscription Price and select your pricing tier
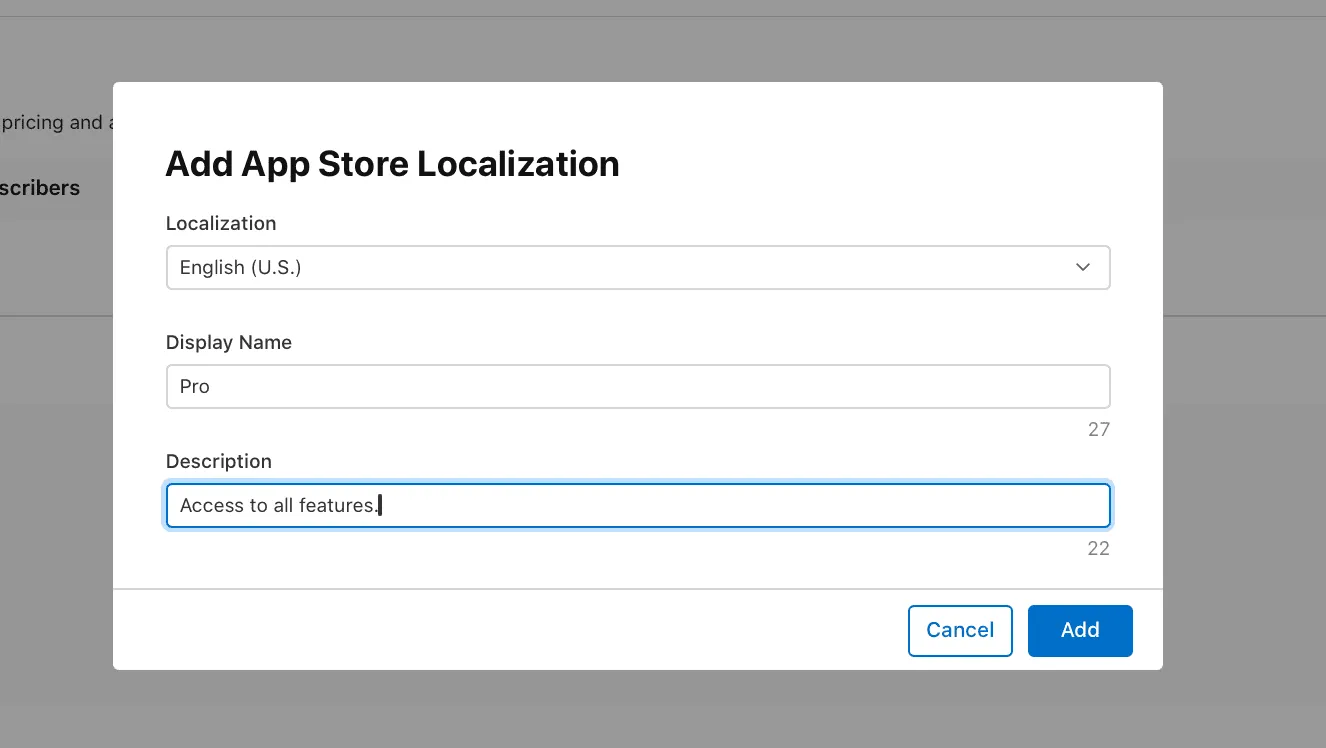
- Click Add Localization to enter the display name and description
- Click Save in the top right
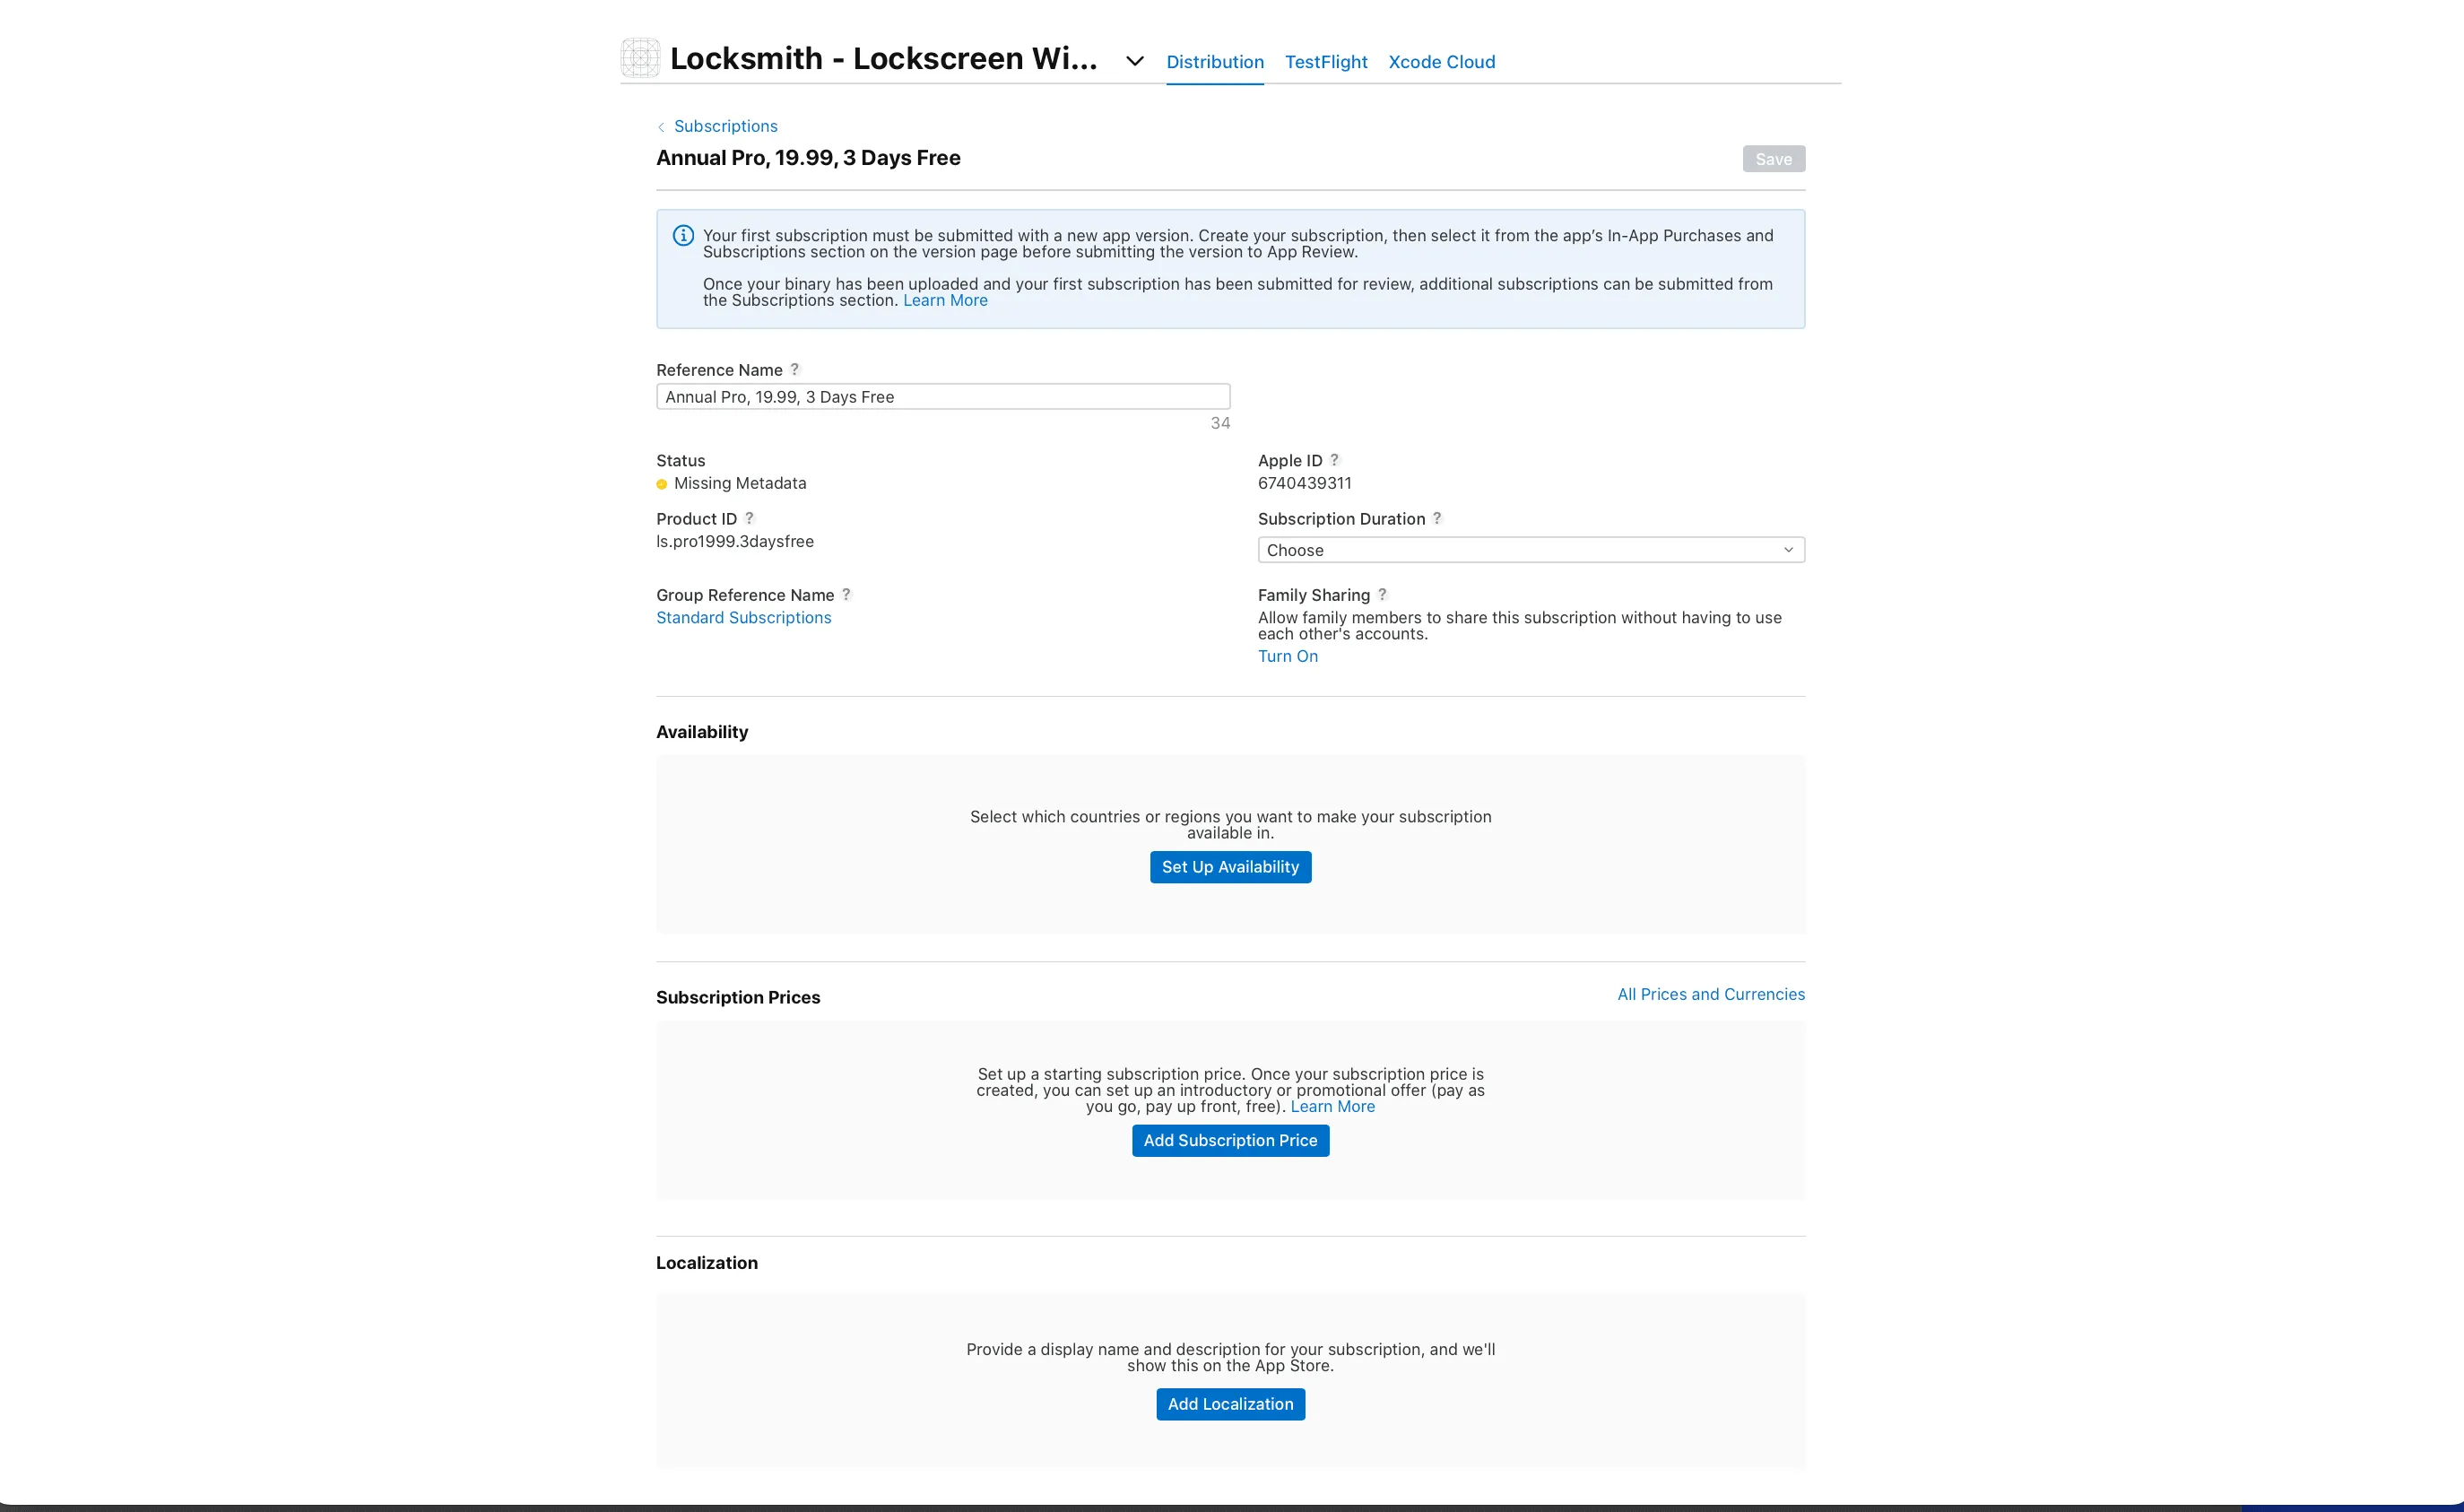
Adding a free trial or introductory offer
To include free trials or introductory offers:
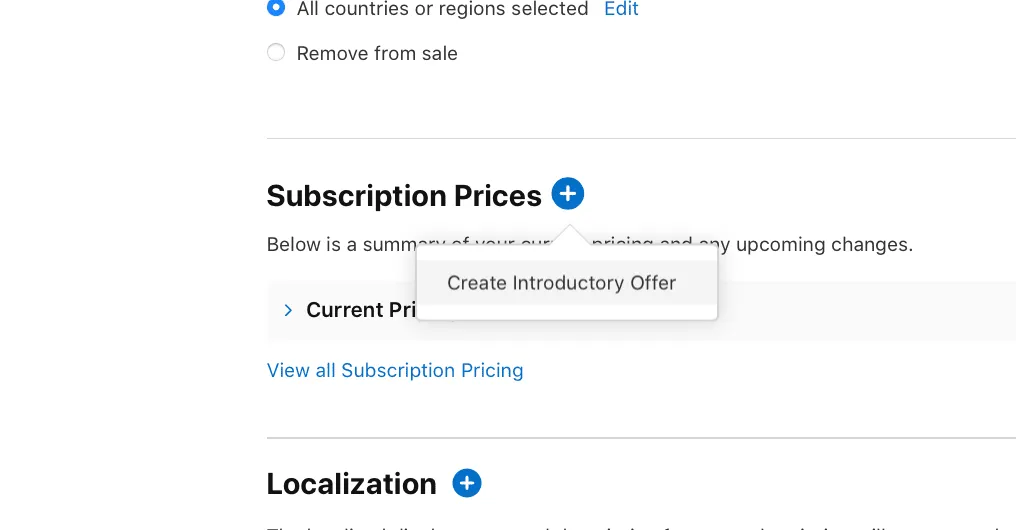
- Click the plus button next to Subscription Prices and select Create Introductory Offer
- Click Next to select applicable territories
- Choose start and end dates (for free trials, typically set today as the start with no end date, then click Next)
-
Select your introductory offer type:
- Pay as you go: Discounted periodic payments during the introductory period, then standard rate renewal
- Pay up front: Total discounted price paid upfront for the entire introductory period, then standard rate renewal
- Free: Trial period (e.g., 7 days free) followed by standard pricing
- Choose territories and click Confirm
Repeat this process for all subscriptions you plan to offer.
Adding subscriptions in Superwall
At this stage, create a free Superwall account and add your iOS app. Two instructional videos simplify the process:
Once complete, you will have:
- Created subscriptions
- Added products into Superwall (which automatically creates a default entitlement)
- Established an infrastructure to present paywalls and offer products
An entitlement represents permission to access specific app features. One entitlement typically suffices for most apps, granting access to all premium features upon active subscription.
Detailed documentation on adding products to Superwall is available in their guides. Return here after completing those steps.
Configure the Superwall SDK
If not already completed during app creation, install and configure Superwall:
Testing a purchase in the simulator or device
Add a StoreKit Configuration file to test purchases before App Store release. This file allows rapid testing of new products without App Store approval. The configuration syncs products from App Store Connect to your testing environment.
Display a paywall with this code:
Superwall.shared.register(placement: "campaign_trigger") {
    print("Unlock feature.")
}
A paywall appears with your products, ready for testing purchases.
Testing a purchase in TestFlight beta builds
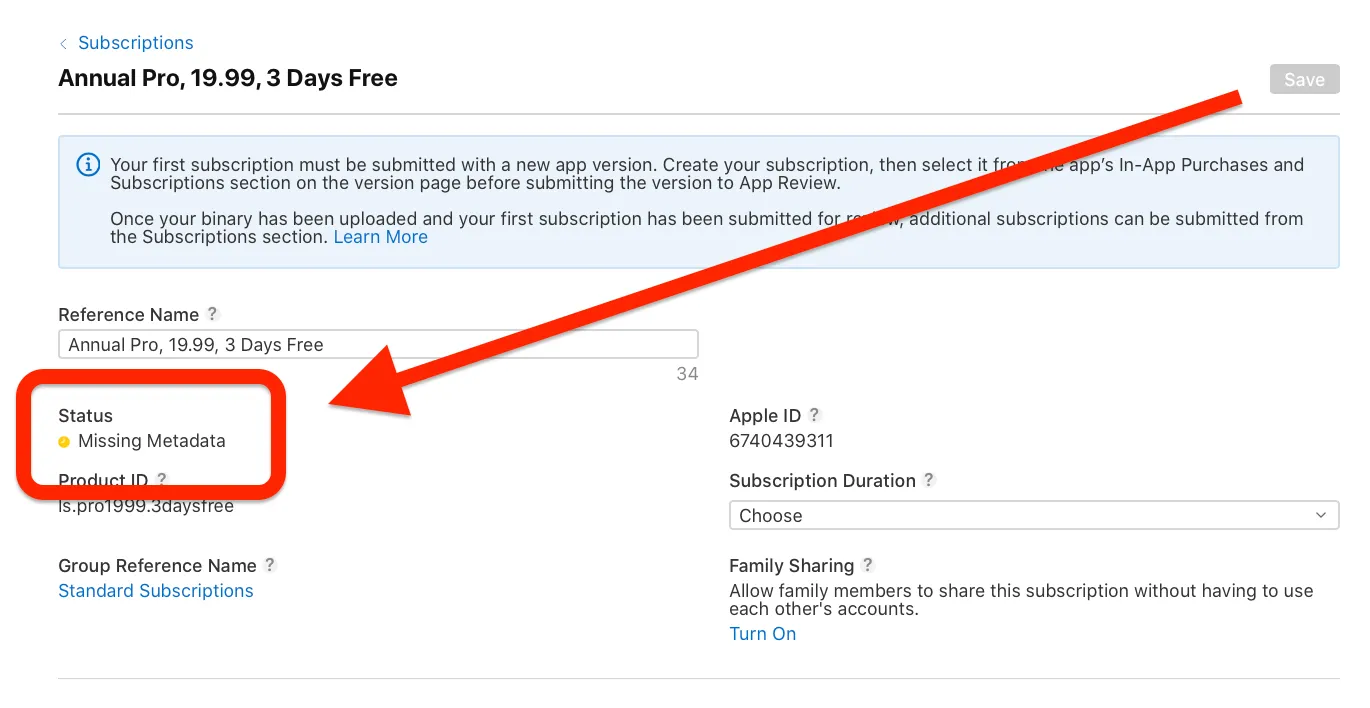
Before TestFlight testing, ensure subscriptions are not in "Missing Metadata" status—this is critical and represents the most common issue for new developers. Products must reach "Ready to Submit" or "Approved" status.
For first-time launches, subscriptions must be in "Ready to Submit" status. To achieve this:
- Ensure all localization fields are complete
- Complete all developer agreement forms
- Submit tax and banking information
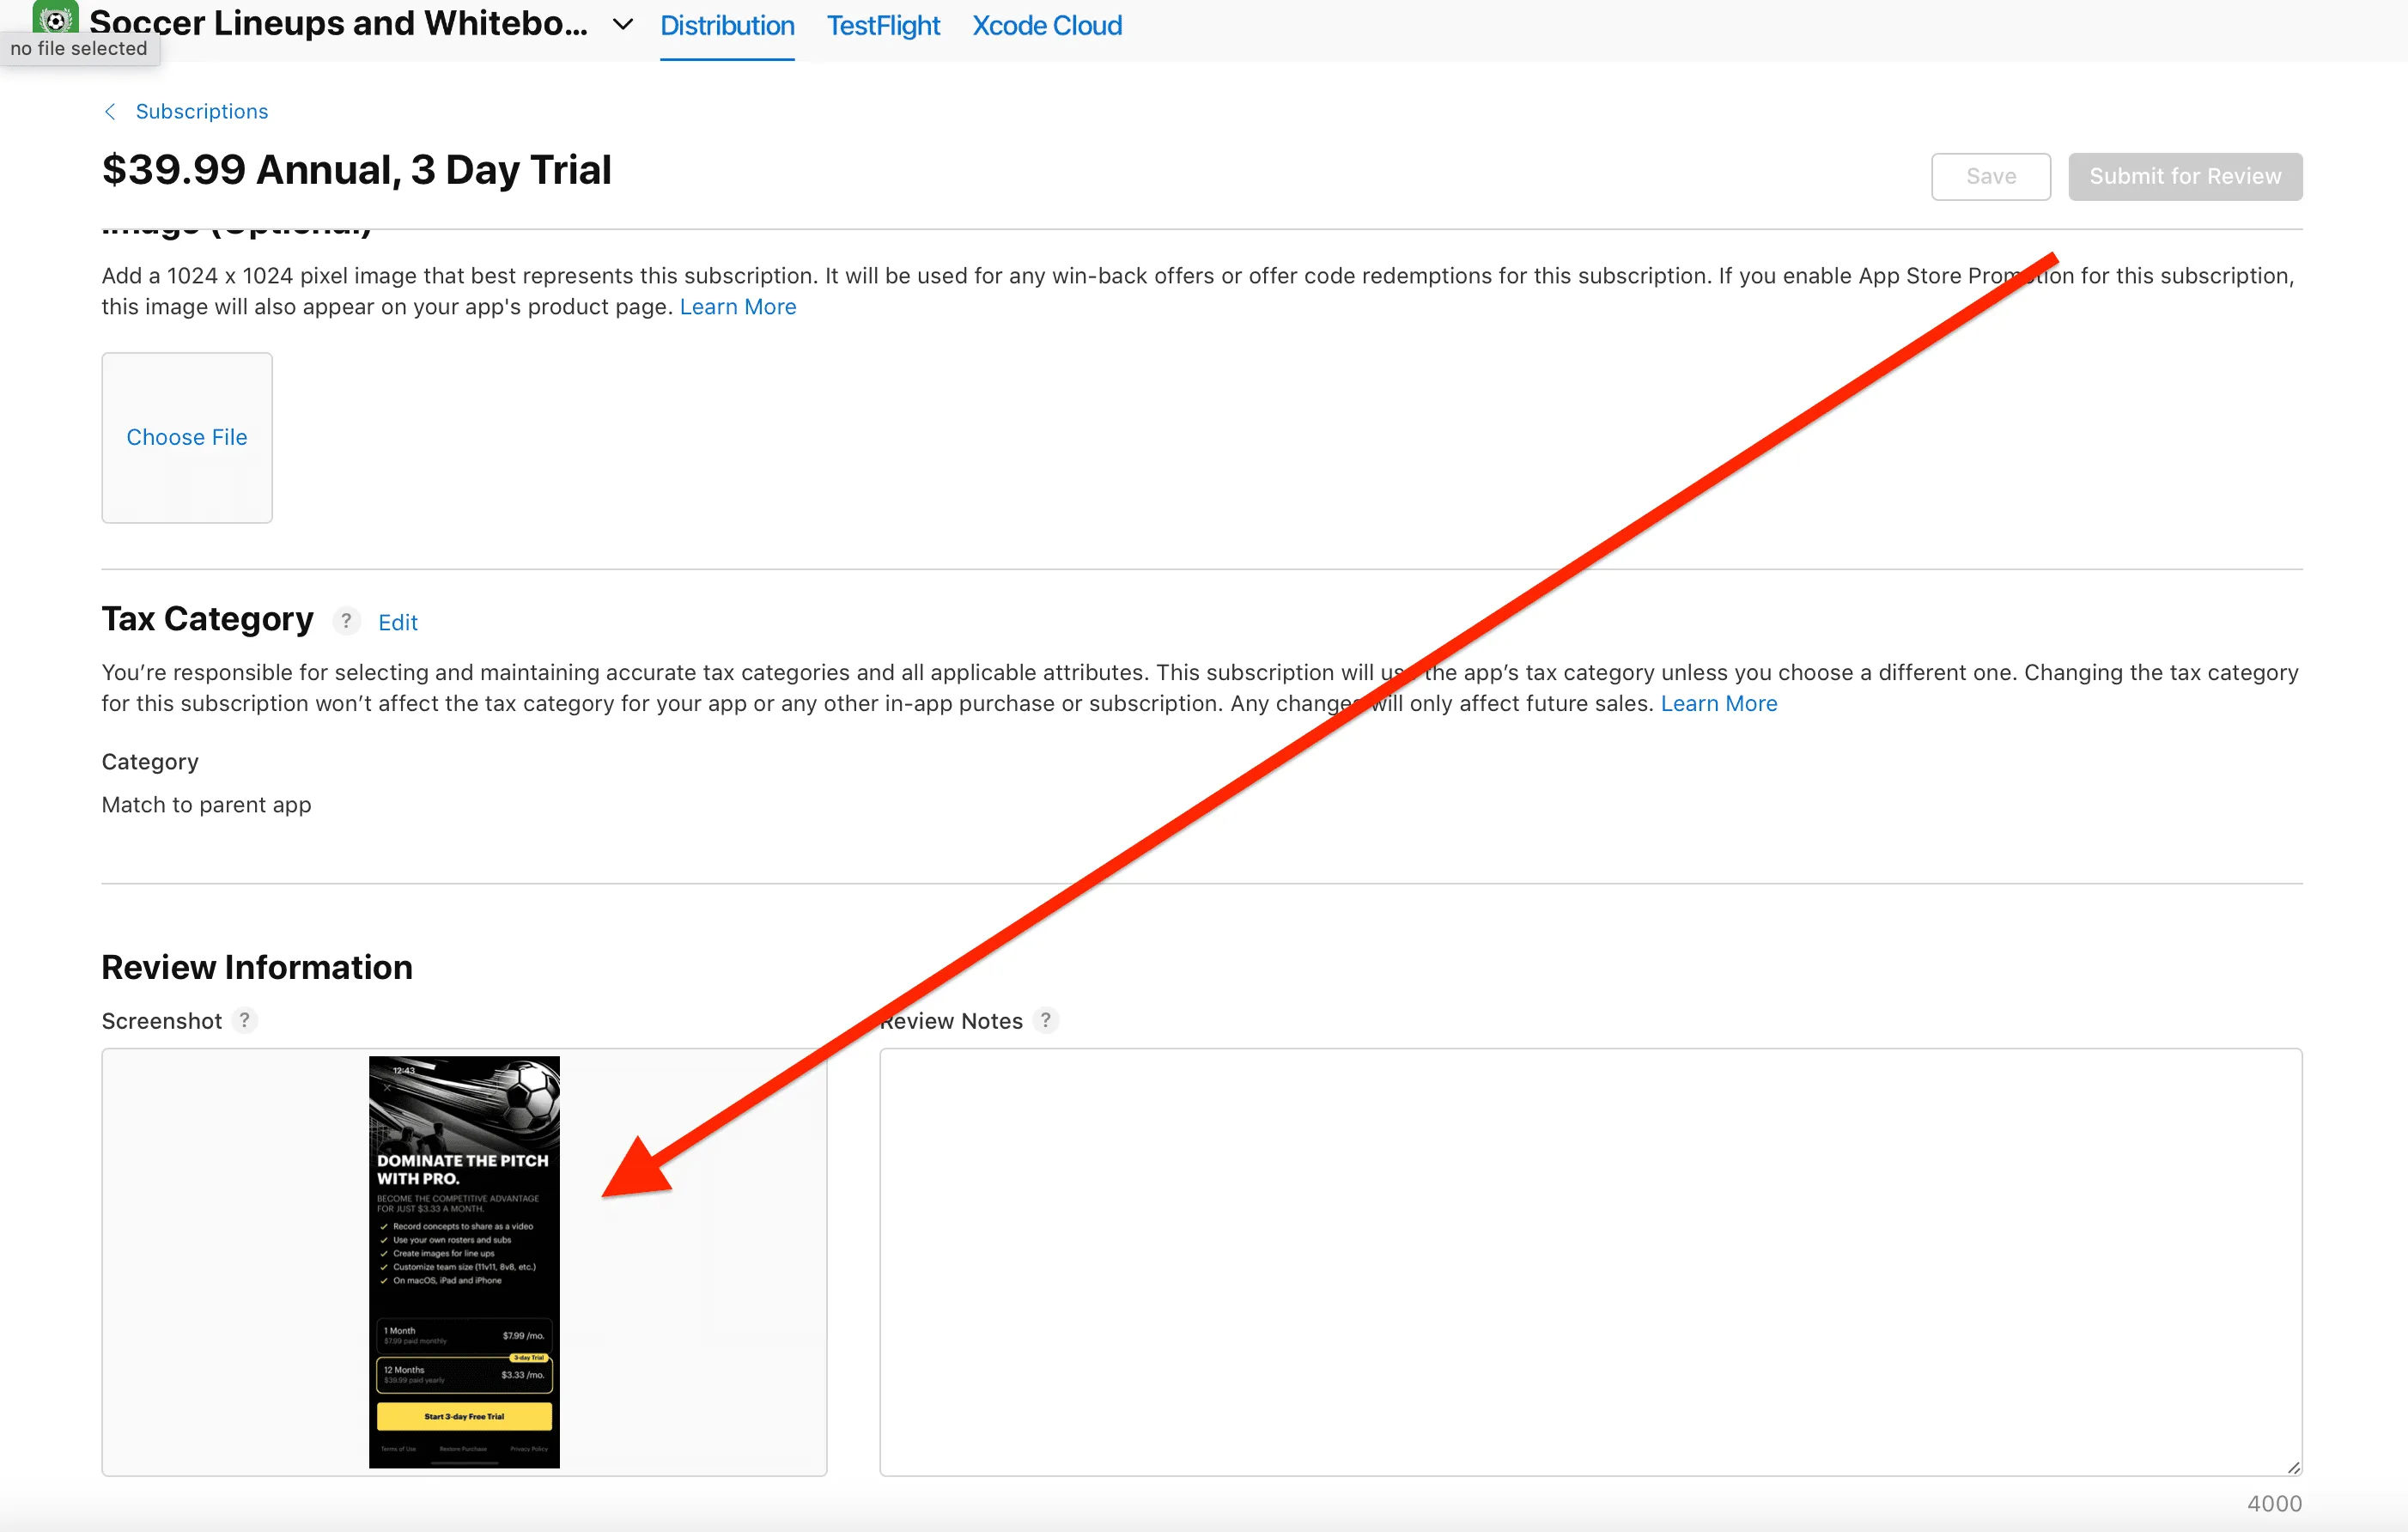
Subscriptions require a screenshot for review. Test your app in the simulator, press Command+S to capture a paywall screenshot, then upload it:
- Open the subscription in "Missing Metadata" status
- Under Review Information, upload the screenshot
Archiving a build
Package your app for TestFlight:
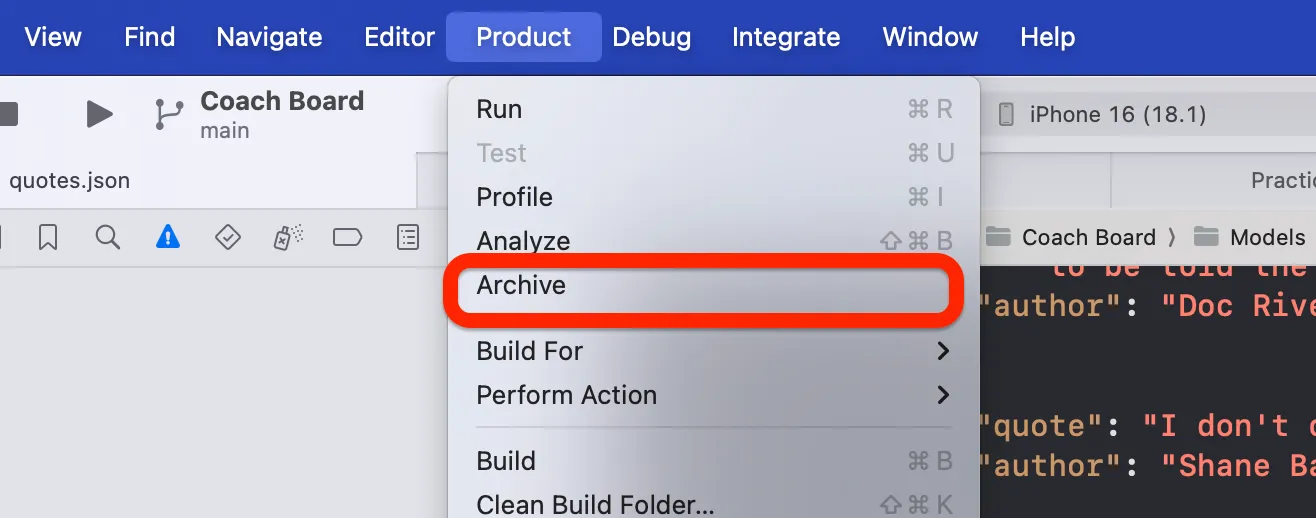
- In Xcode, select Product > Archive
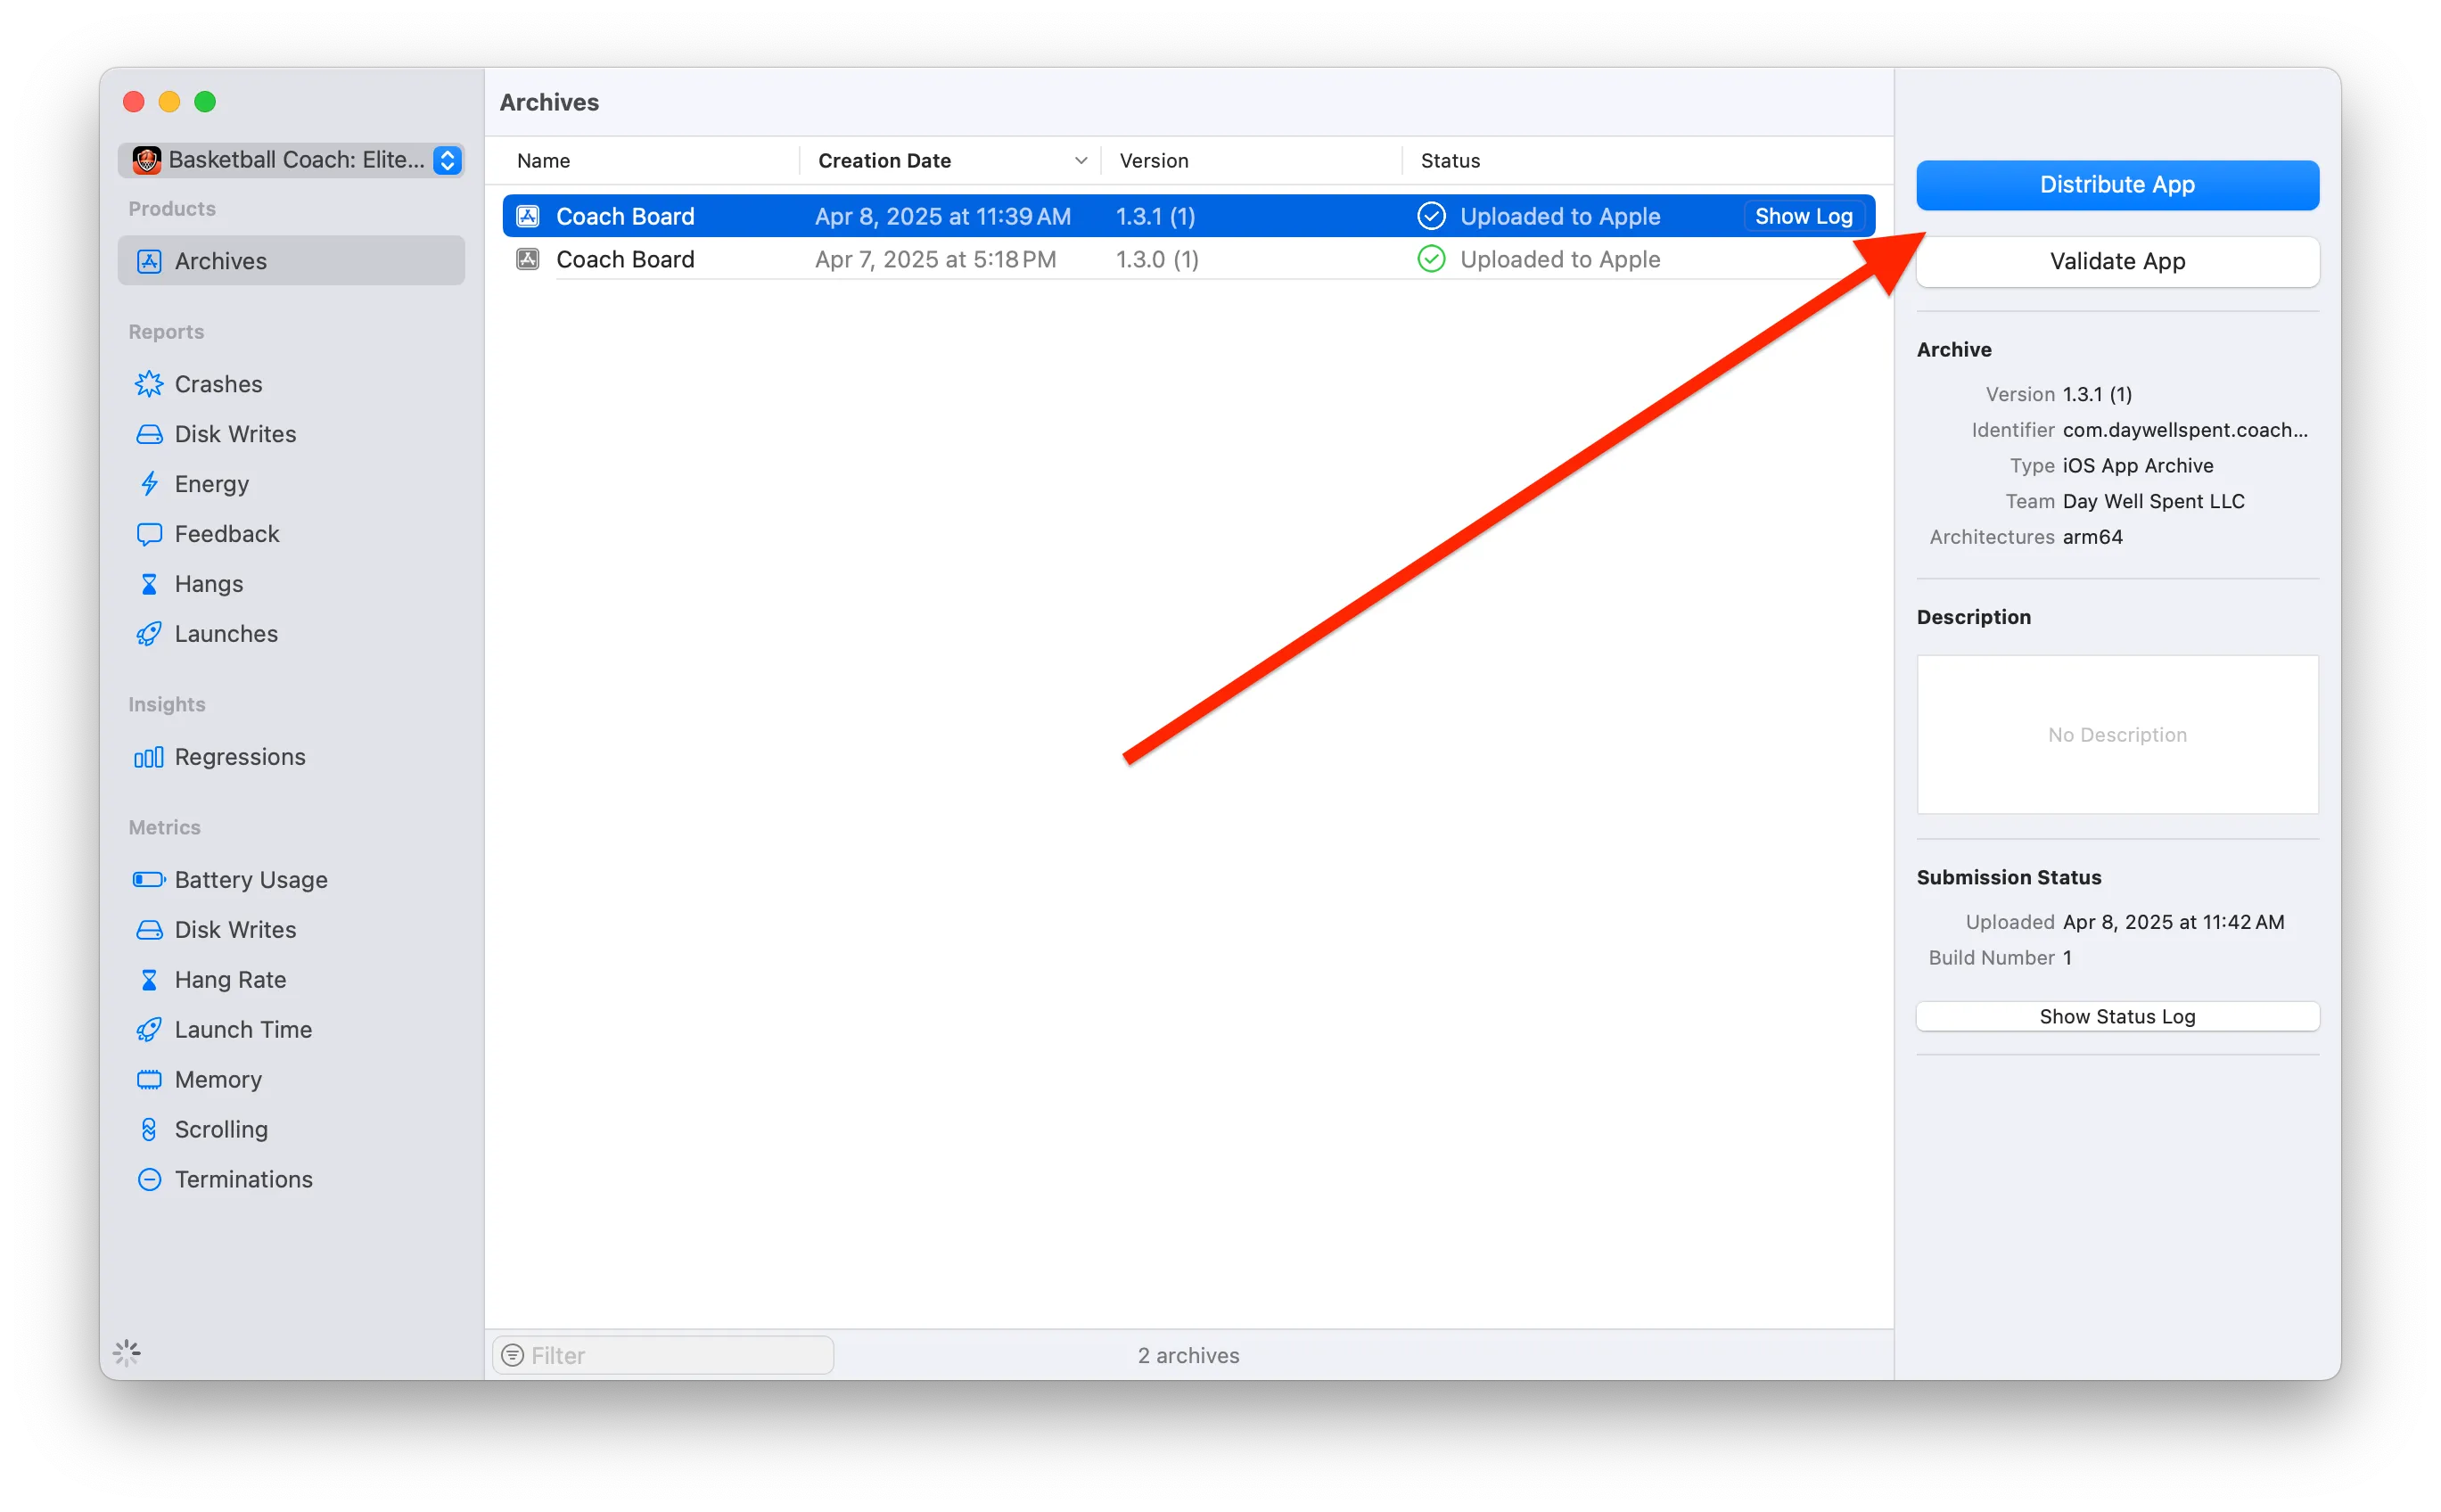
- Once archived, Xcode's Organizer opens—select your archive and click Distribute App
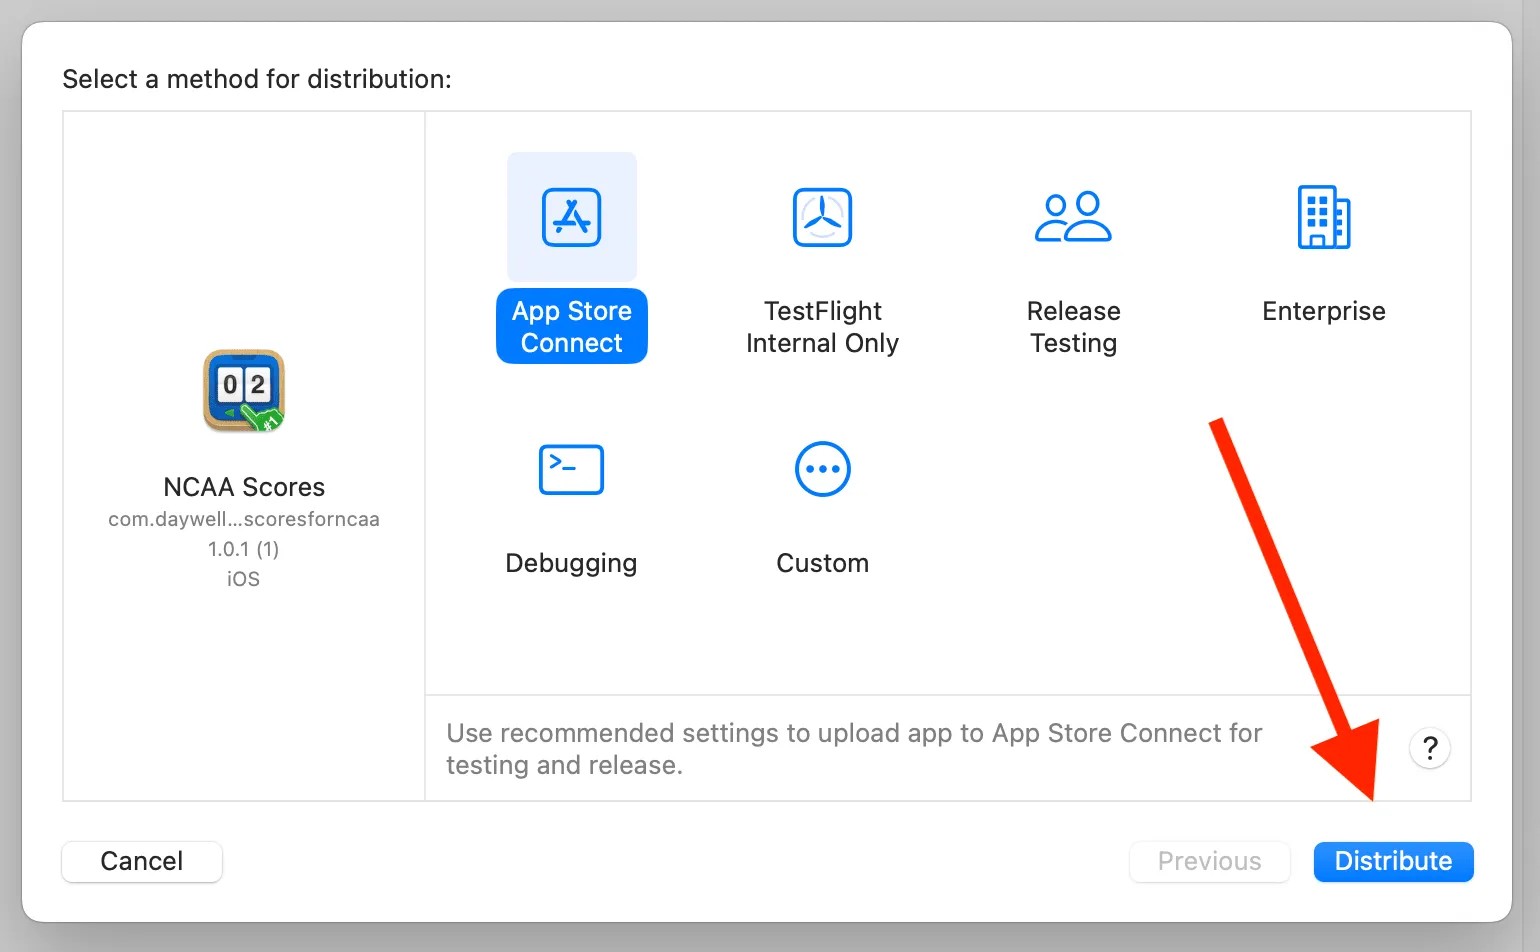
- Choose App Store Connect and click Distribute
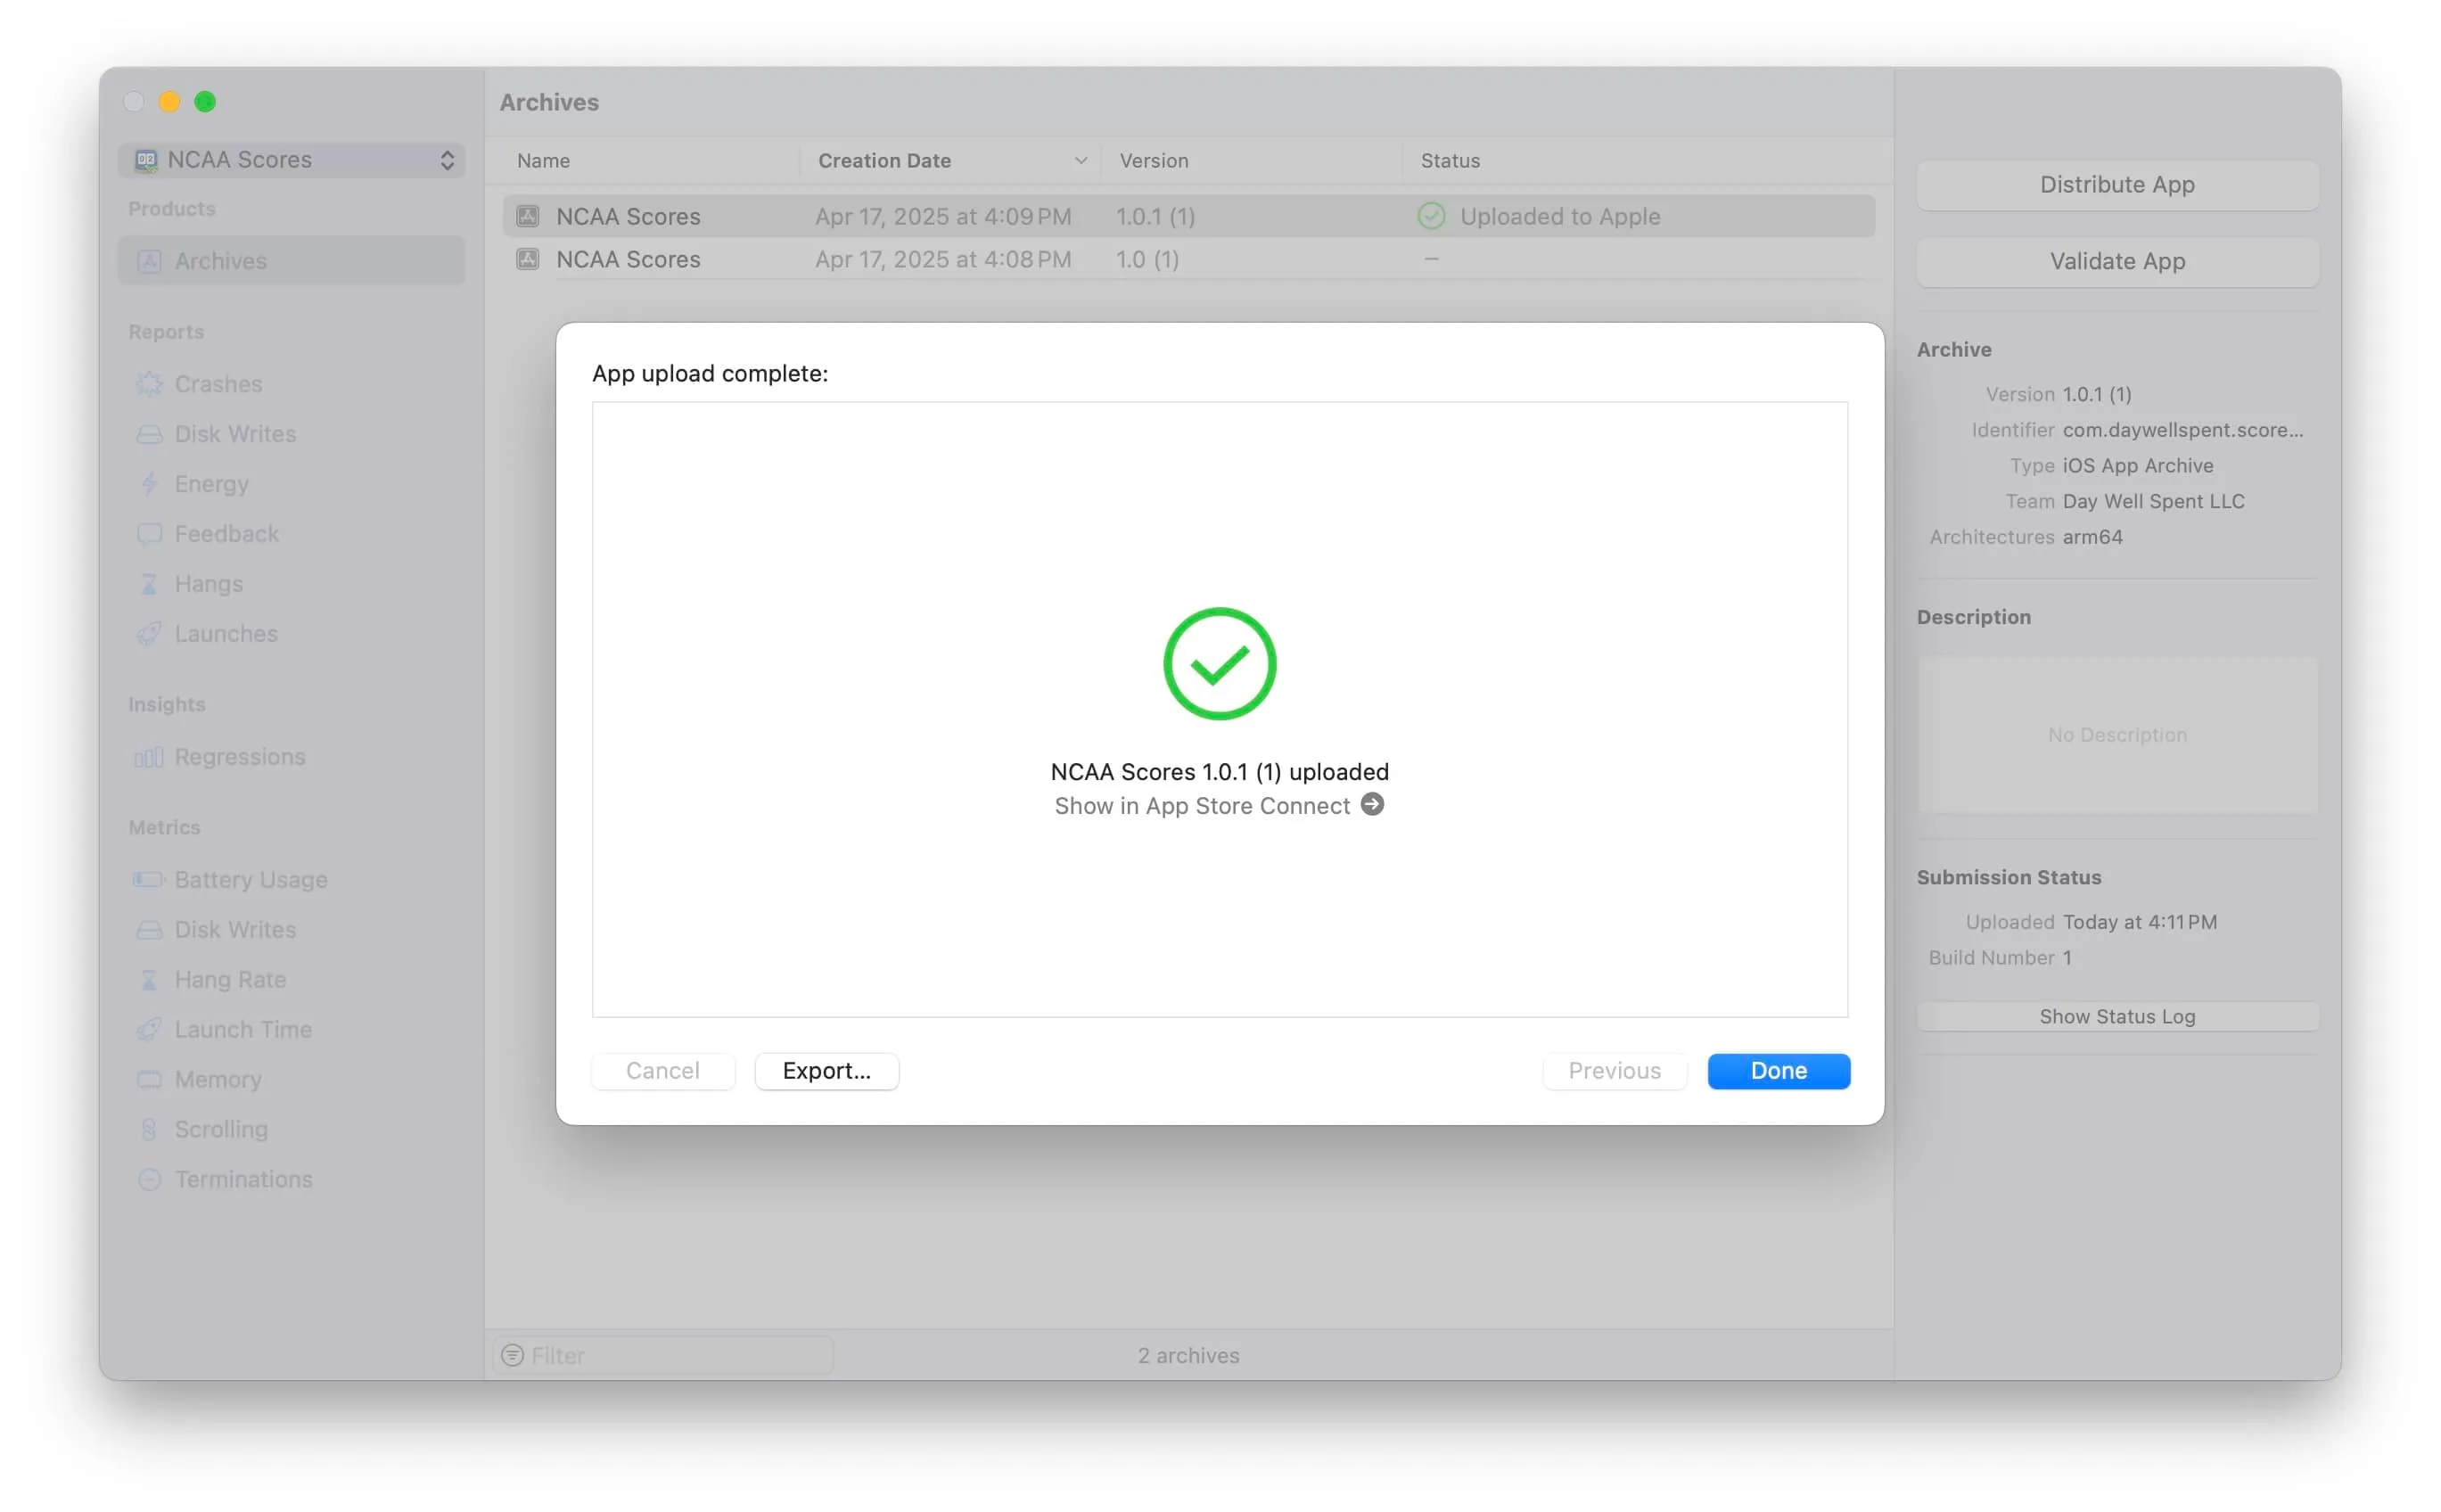
You'll receive confirmation of successful upload to App Store Connect.
Making a public test build via TestFlight
In App Store Connect's TestFlight tab, locate your uploaded build. It may show "Processing" status initially, typically completing within 5-10 minutes. Once "Ready to Submit" appears:
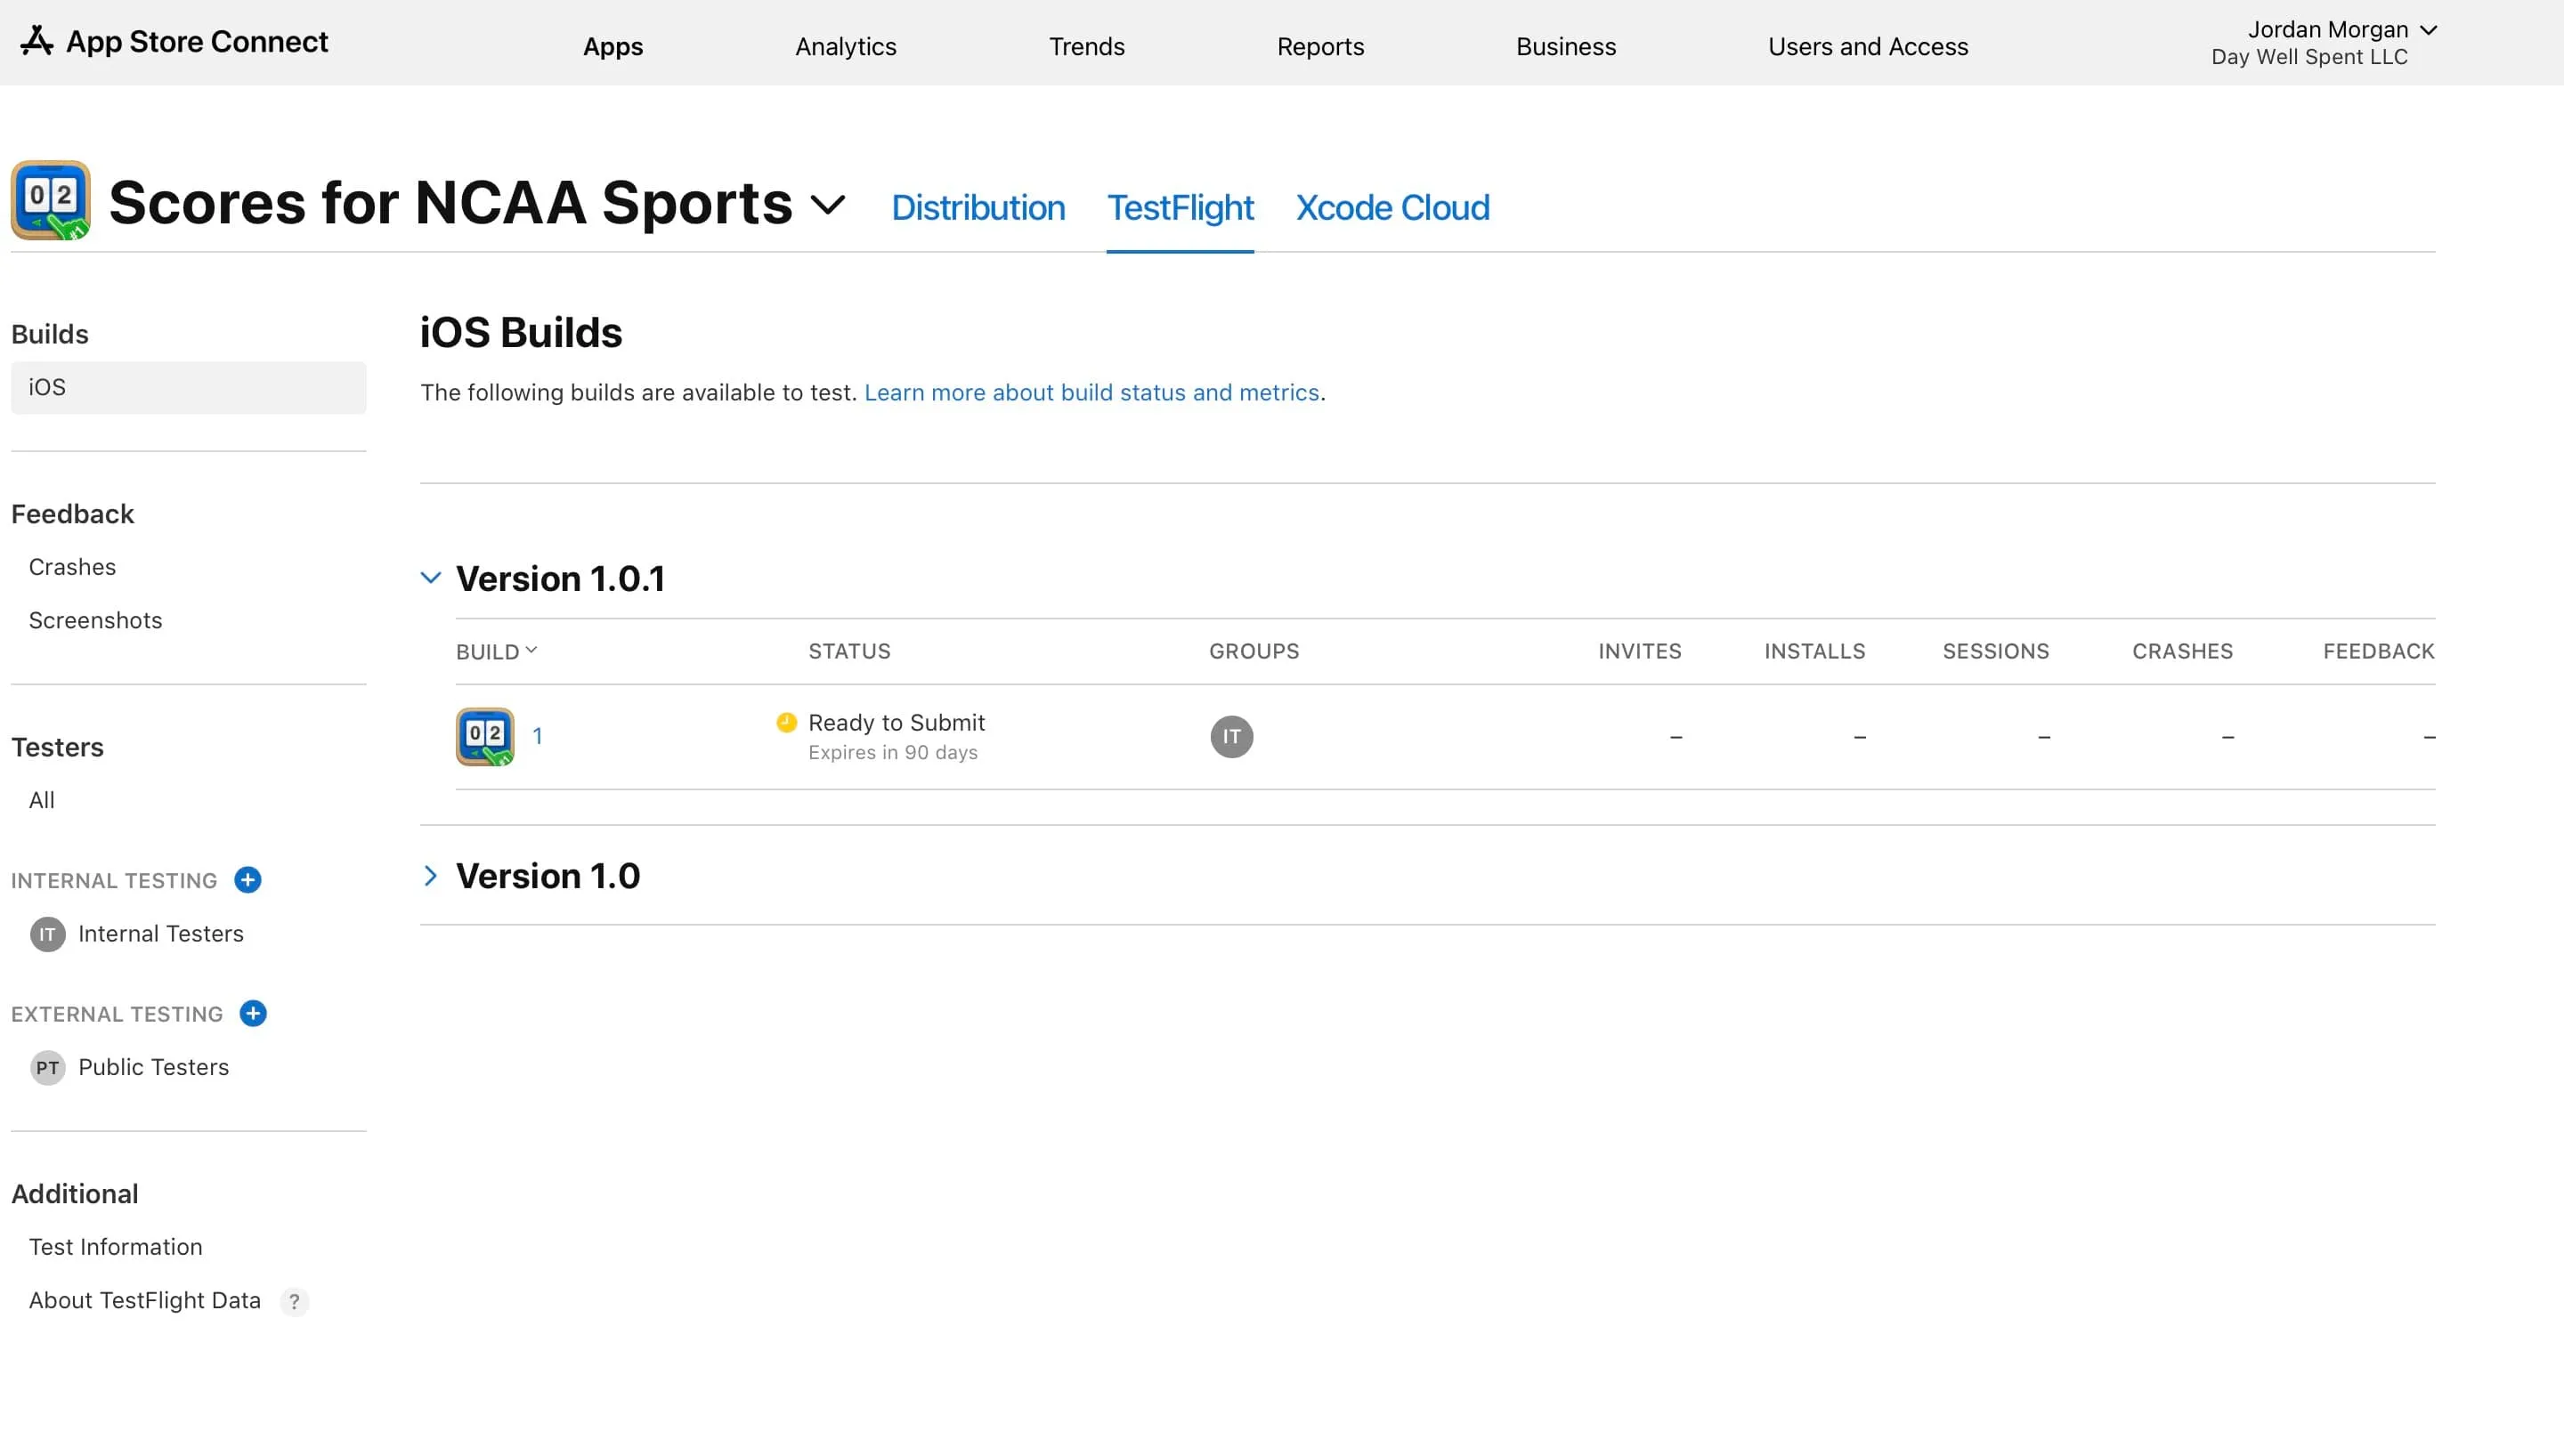
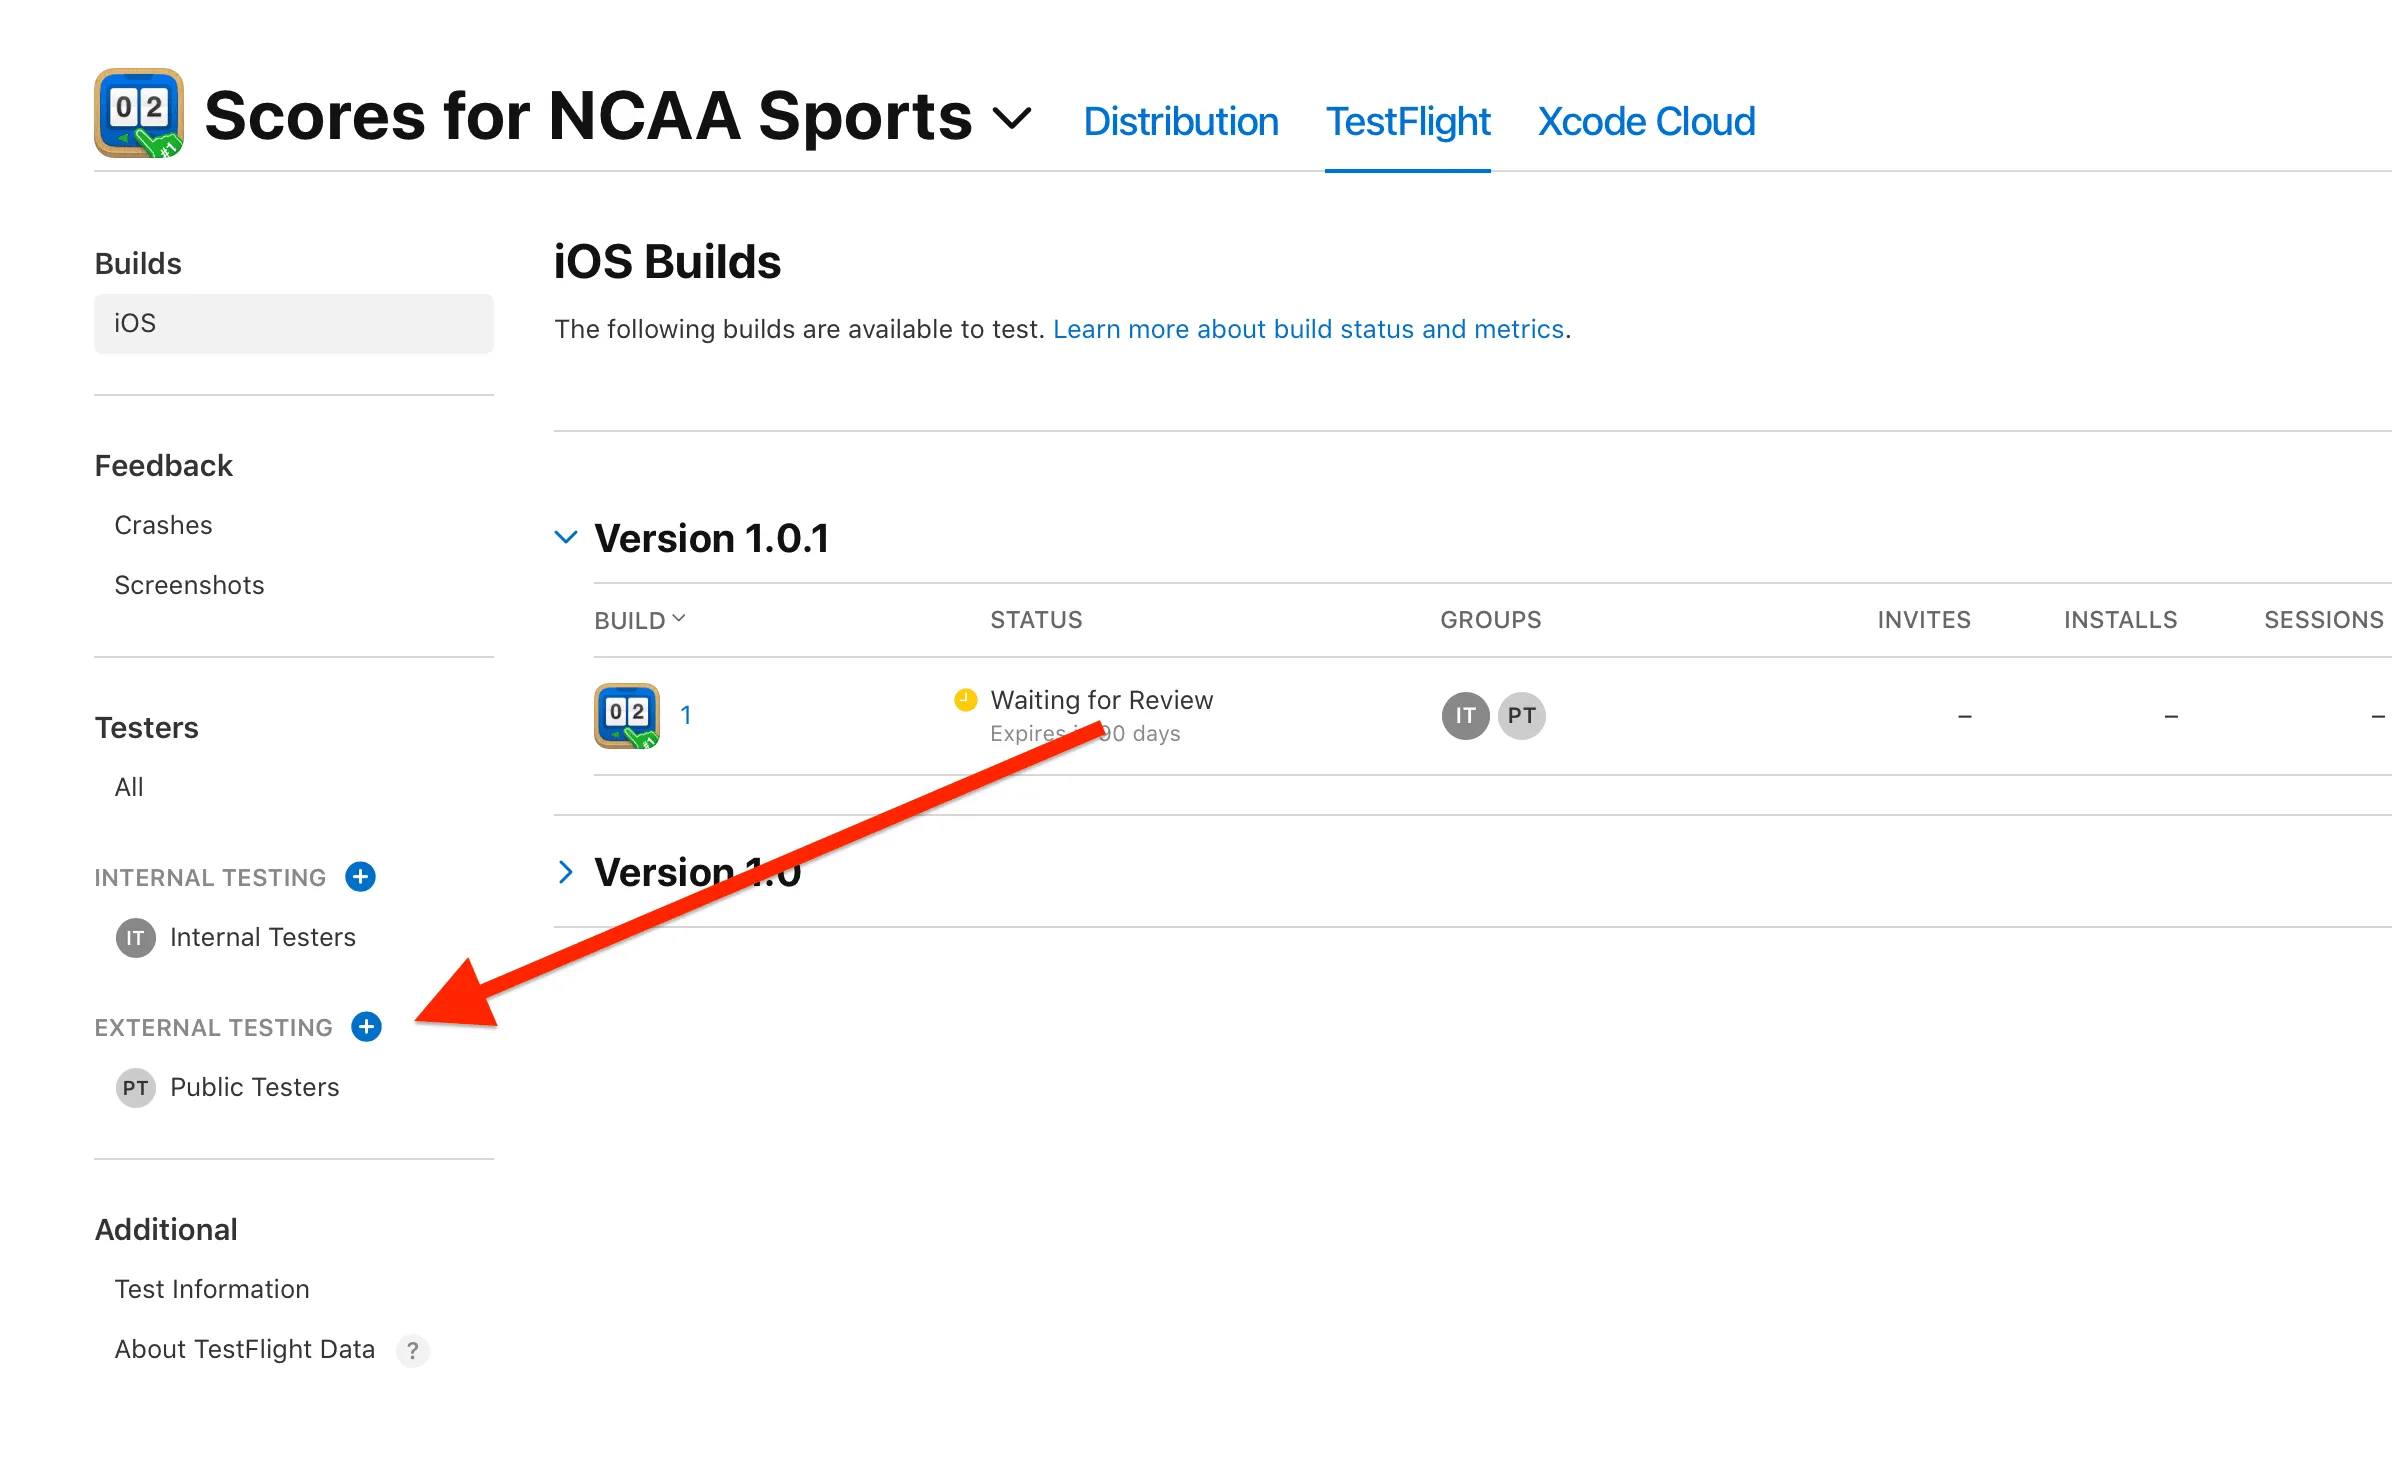
- Click the plus button next to EXTERNAL TESTING to create a new public testing group
- Name the group and save
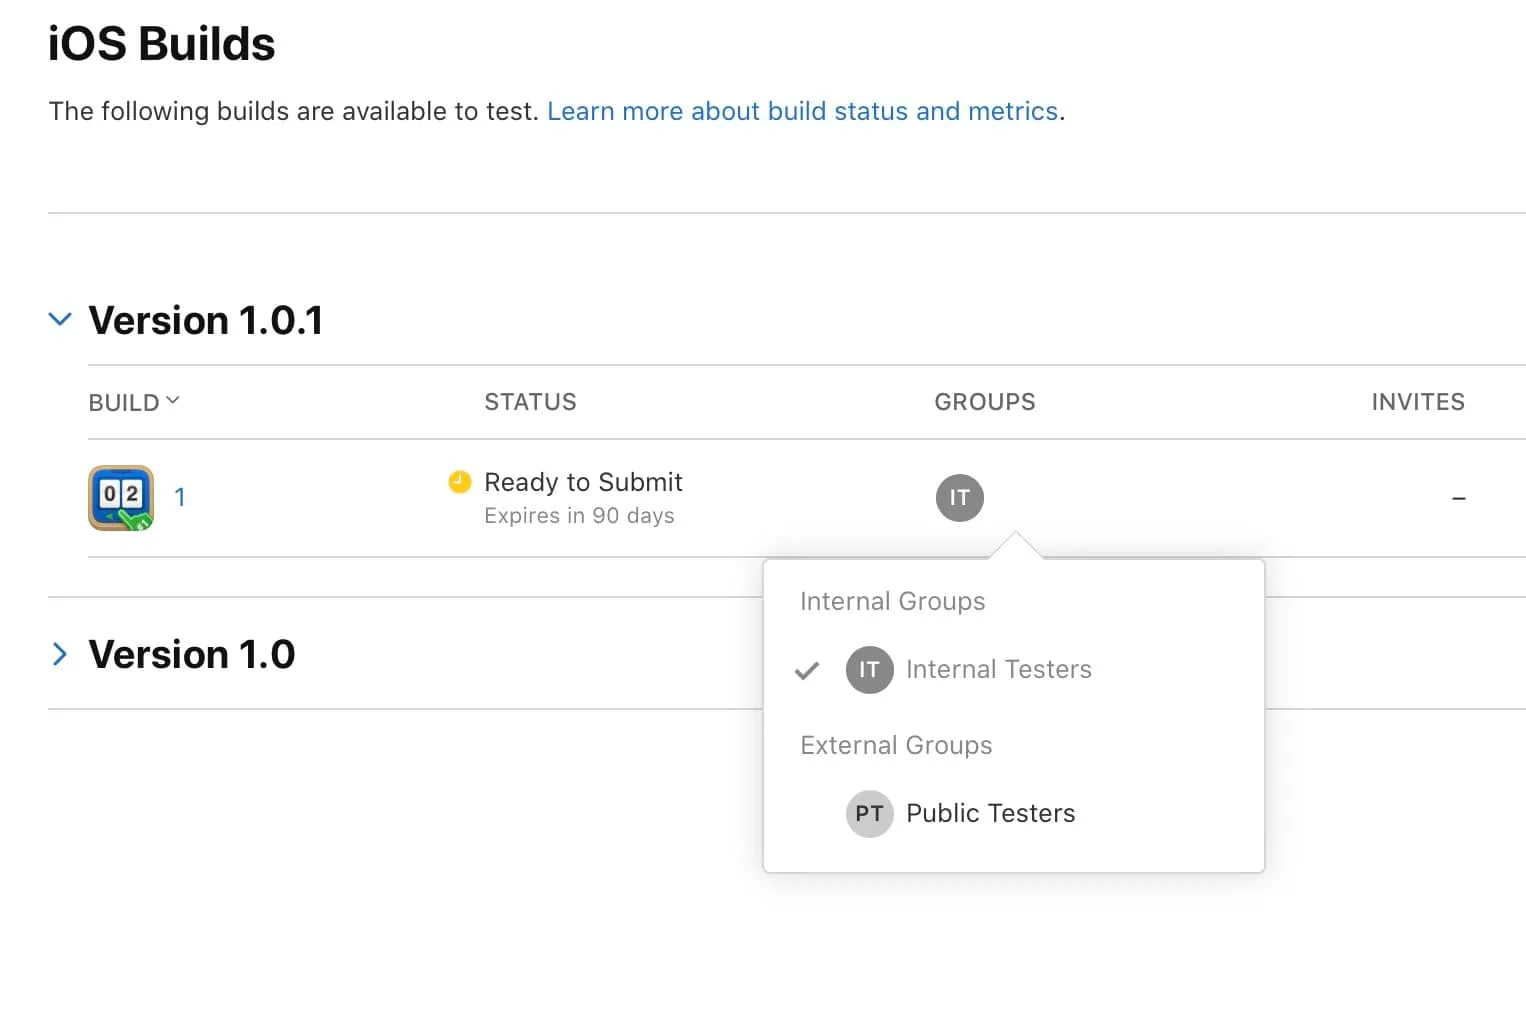
- Under Builds > iOS, click the plus button for your build and assign it to your public testing group
- Enter release notes and submit for review
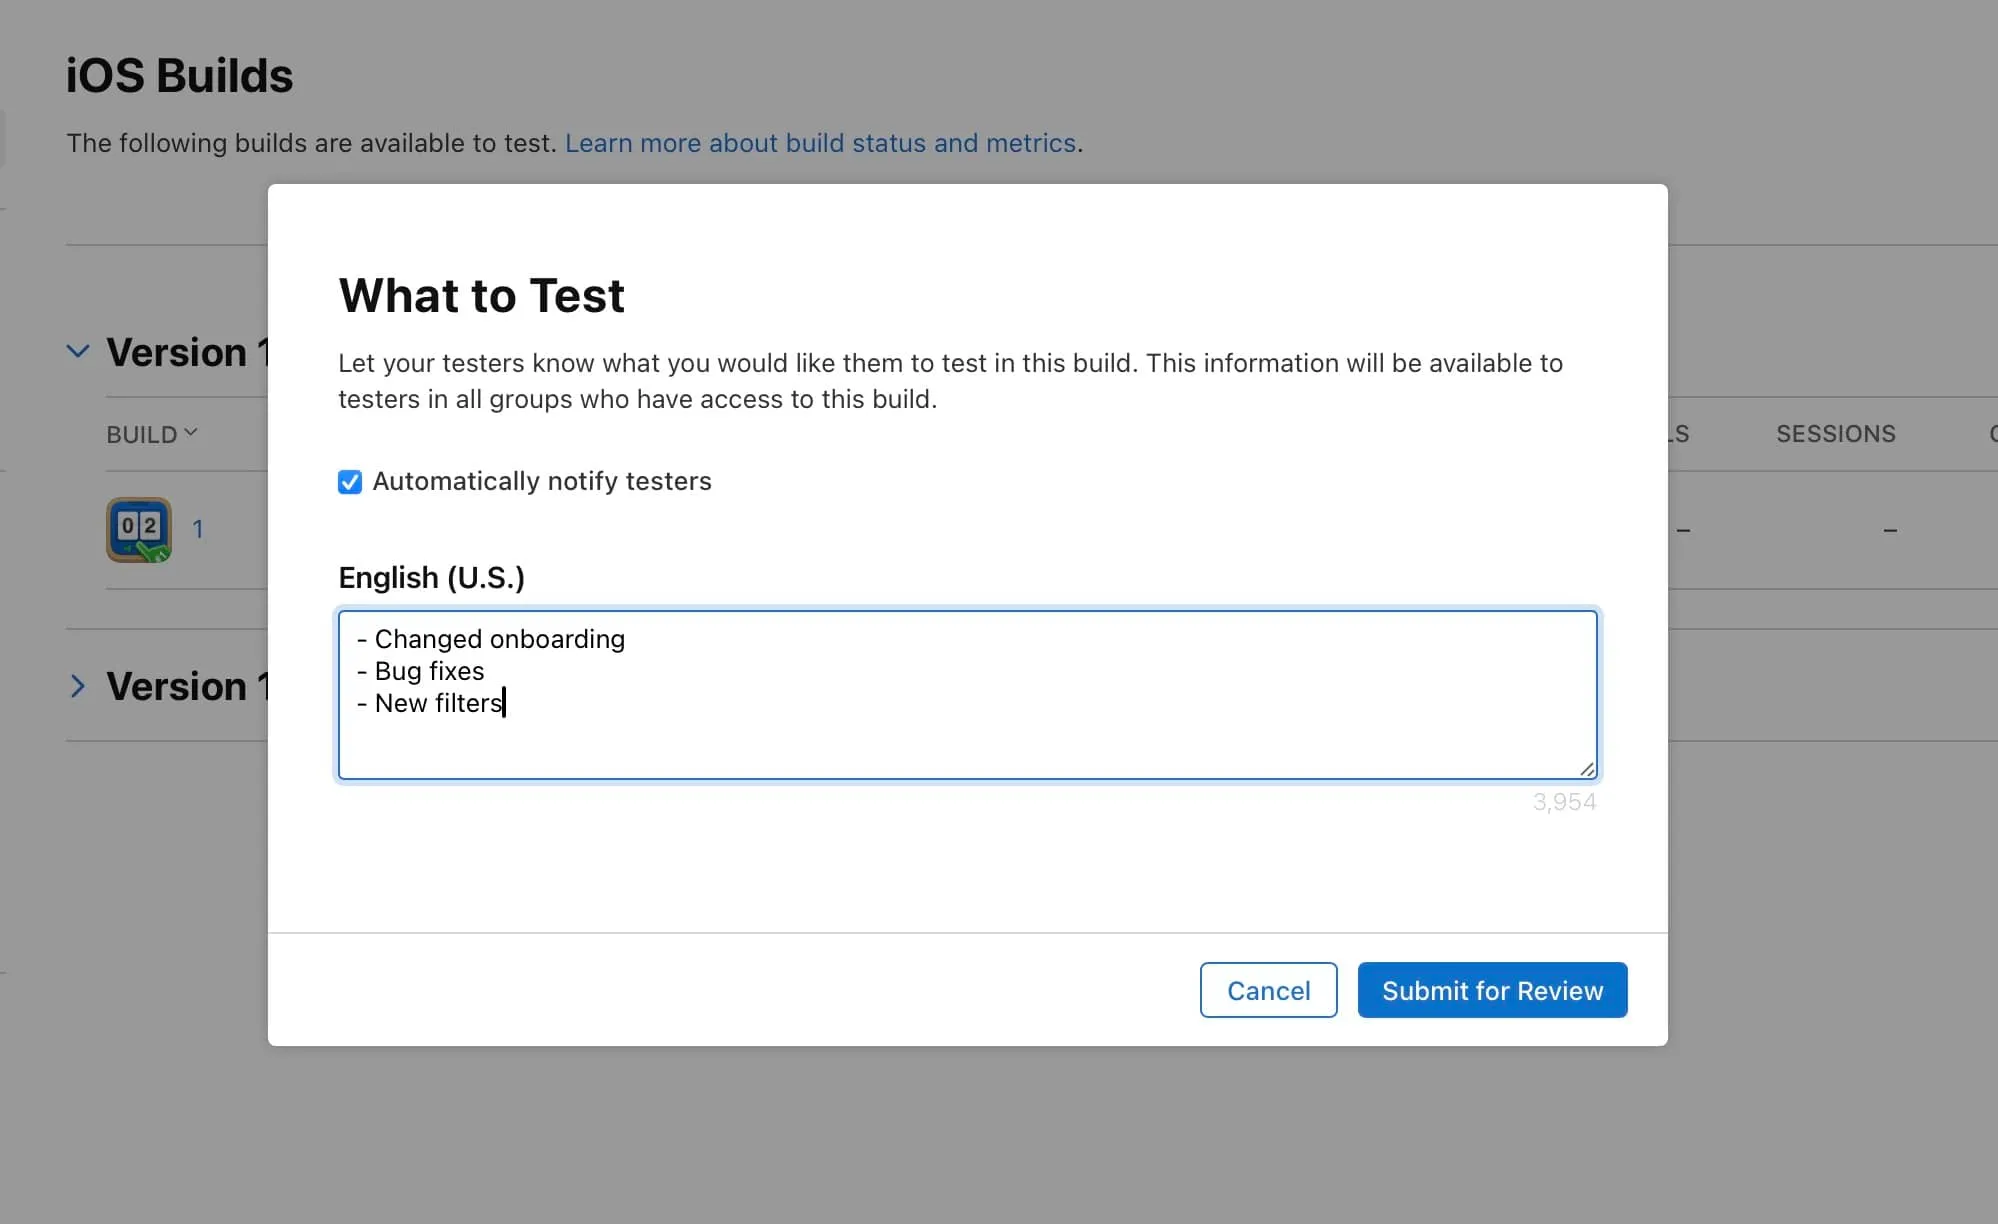
Your build enters "Waiting for Review" status. Upon approval, public testing and purchases become available.
Launching your first app and products
If testing succeeds, prepare for launch. In App Store Connect, select Distribution.
Filling out release data
Complete all release metadata:
- App Store screenshots
- Keywords
- Product descriptions and details
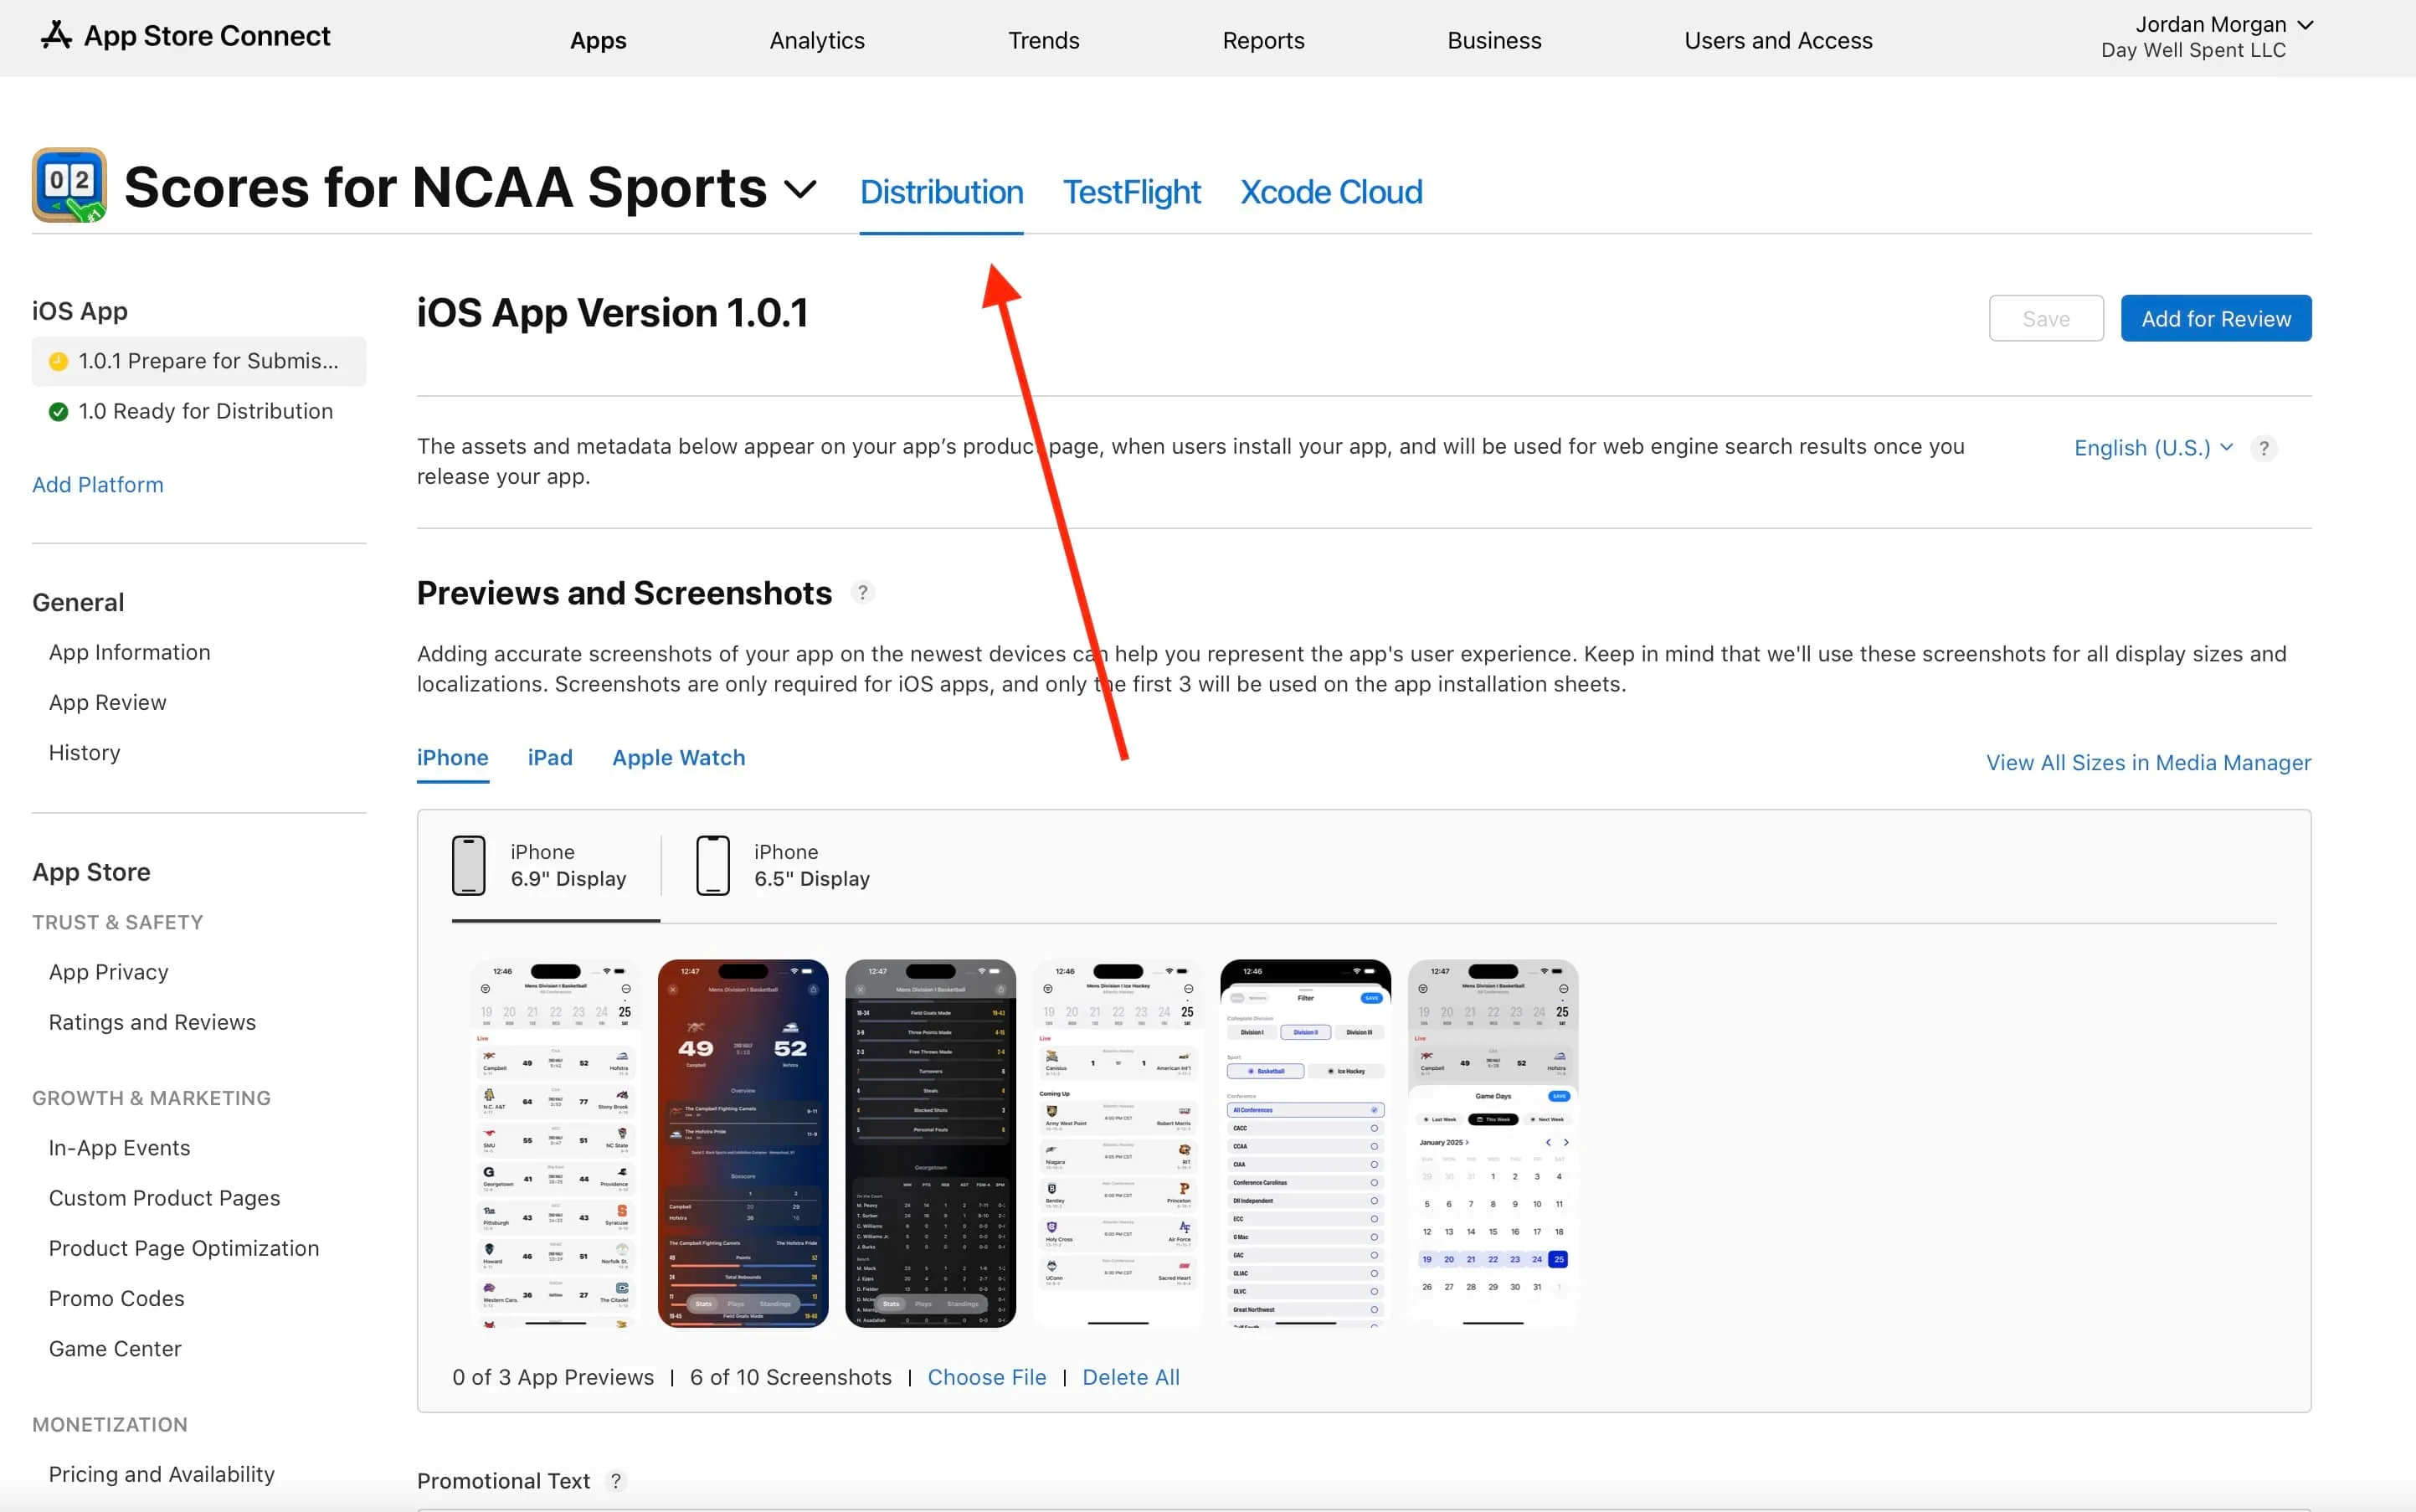
App Store Optimization (ASO) significantly impacts search visibility. Keywords, app name, subtitle, and screenshots all influence ranking. These elements can be adjusted between releases, so avoid overthinking initial choices. Shipping should take priority over perfectionism—improvements can follow launch.
Sending a build and subscriptions to review
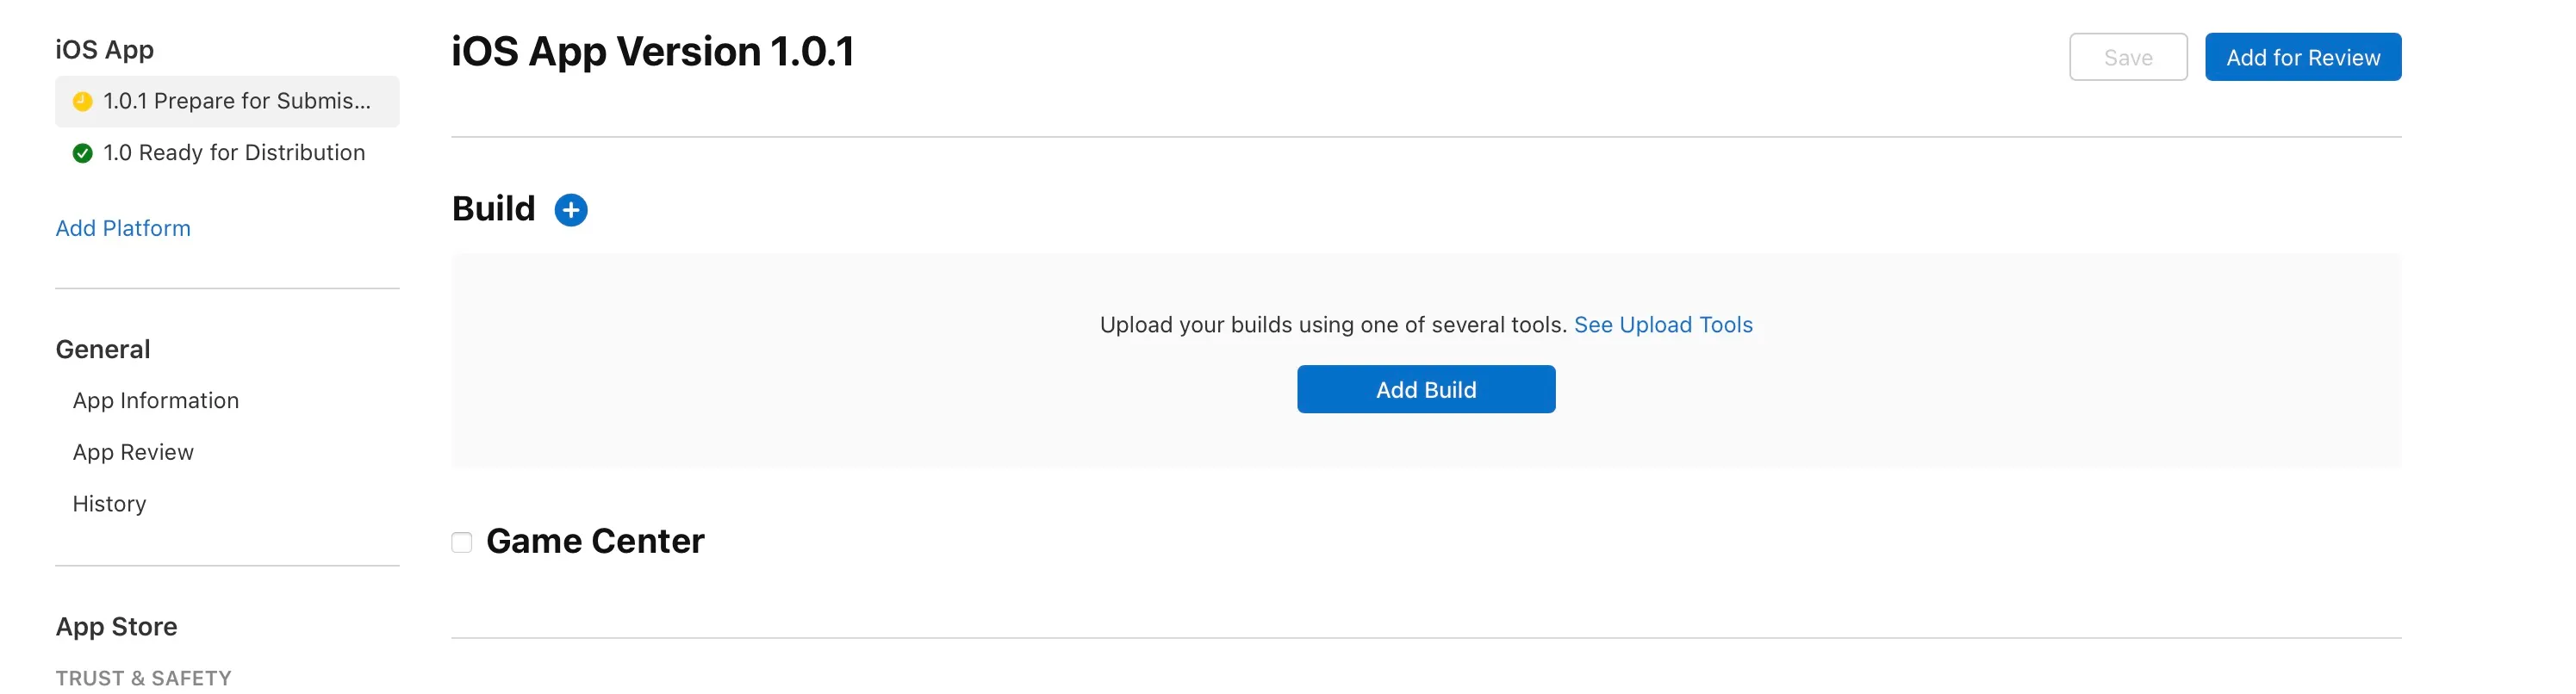
Under Build, select the tested build (or a newer version if updates occurred). This becomes your submission to App Review:
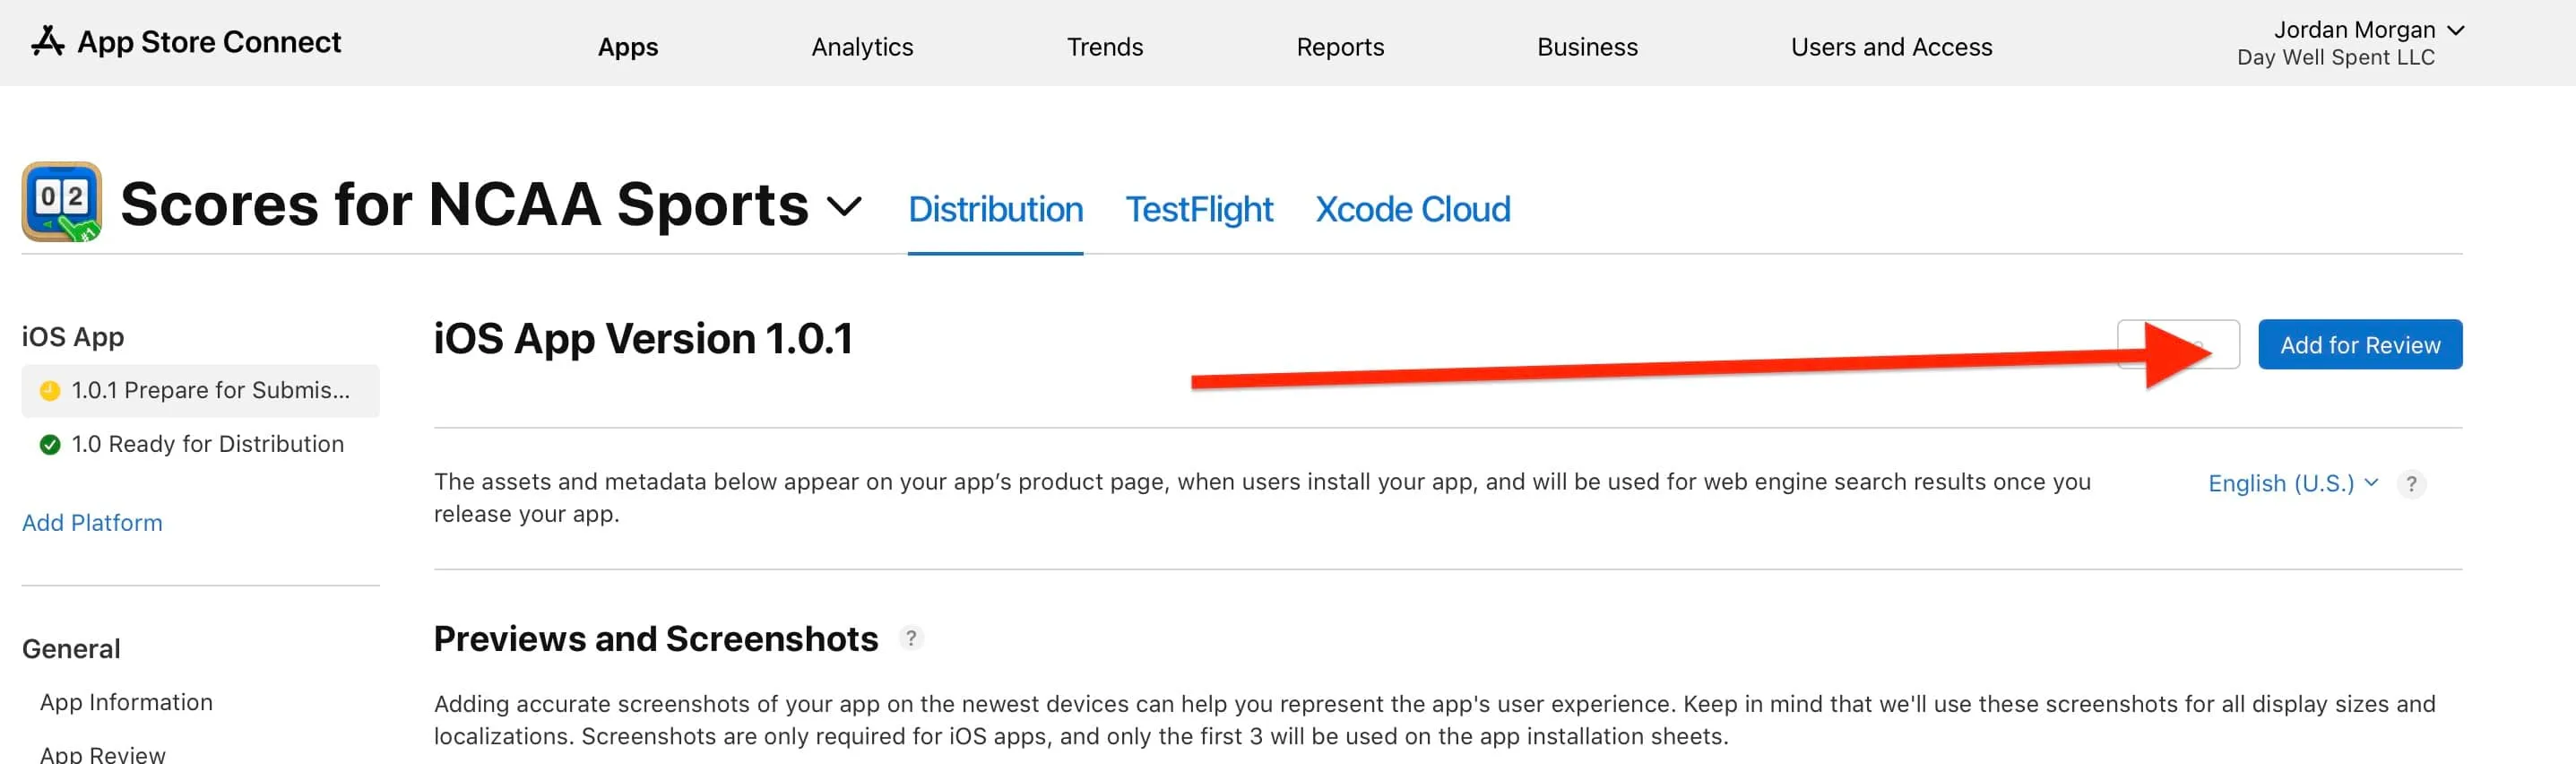
- Click Add for Review
- Follow all prompts
- Your subscription products should also appear for review submission
If products don't automatically appear, open them individually and submit separately.
Apple will review your build and products. Rejections occur frequently and represent normal iteration. Most requested fixes prove straightforward. Few developers achieve approval on first submission—persistence typically leads to eventual success.
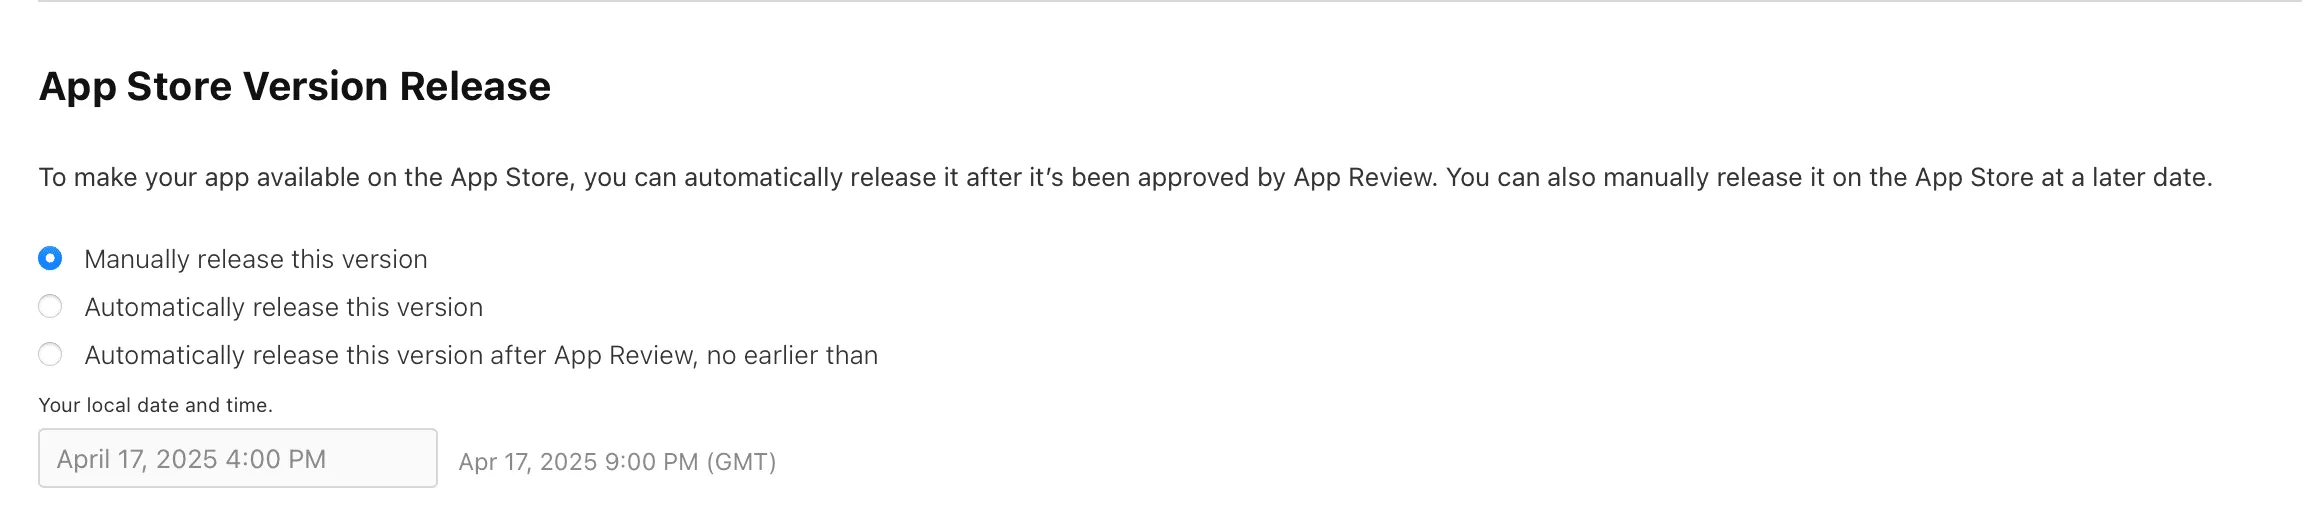
And, you're live!
Your app is now submitted and headed to the App Store. Completing this initial release represents the challenging portion of the process. Subsequent releases become progressively easier with experience.
Now that your app includes Superwall in production, advance to paywall experiments, A/B testing pricing, and additional optimization strategies. Support is available via X/Twitter or email for questions throughout the journey.